Sunday, November 30, 2014

A YEAR OF FAVORS-CHRISTMAS:

Hello there! Finishing up a year of celebrating with a sweet little Christmas favor for you. I used the adorable Tiny Treat Boxes and stuffed my favorite holiday treat inside~Christmas Nougats...yummy:) You can fit 3 or 4 inside.

For the tag I used leftover kraft cardstock from the Many Merry Stars Kit, as Crumb Cake was a little too light for my liking. I used the Note Tag Punch and the tree from Holiday Home in Early Espresso along the left side of the tag. I used the Tree Punch with Trim the Tree DSP Stack, cutting off the bottom part of the tree. I punched 2 trees for each tag, scored them down the middle and stapled them together. I used the Confetti Star Punch in Crushed Curry Cardstock and attached with Liquid Tombow. The sentiment was stamped in Cherry Cobbler onto Whisper White. I wrapped a piece of Cherry Cobbler Striped Ribbon aroung the box and tied a knot. I attached the tag with Crumb Cake Thick Baker's Twine from the Under the Tree Tag A Bag Accessory Kit.

 I was kind of afraid I'd have all these favors left over with tons of candy & chocolate in the house, which I do not need, but there weren't any left of anything. Mission accomplished!

Dominique's surprise bithday turned out awesome and everyone had a great time. I know he felt loved and missed while he was away.


Check back here when you need some ideas for your celebrations in the upcoming year. Thanks so much for stopping by:)

Saturday, November 29, 2014

A YEAR OF FAVORS-THANKSGIVING:

Hello there! Onto Thanksgiving...and Paper Pumpkin came to the rescue again:) I ordered an extra refill kit and had enough to make 2 'pies'. I mixed up a batch of chocolate chip cookies, but added M&Ms instead of chocolate chips and put it into a round pan.

I let it cool for a bit, but when it was still warm I added some chocolate stars. When it was cool, I cut it into 8 pieces, placed each slice in a ziploc bag and tucked them into the boxes.

I used the recipe on the back of a bag of Nestle chololate chips, and it worked out perfectly for 2 pies:) These were a big hit with kids of all ages. If there's still some refill kits left, you should snag some up and be ready to go when next Thanksgiving rolls around. I'll be 'wrapping' things up with Christmas tomorrow. Make sure to stop back. Thanks so much for stopping by:)

Friday, November 28, 2014

A YEAR OF FAVORS-HALLOWEEN:

Hello there! Next up, Halloween. For these treats I filled plastic gloves with popcorn and candy corn. I first added a piece of candy corn to the end of each finger to look like a nail, then just filled them up. I tied them shut with White & Tangerine Tango Two-Tone Trim and added a spooky ring to a finger.

I also filled a big black cauldren with the popcorn/candy corn mixture and made some Twix or Treats which I stuck into a Rolo to hold them up.

It could be fun to get some king-sized candy bars and have the Twix or Treats sticking out of them as well.

Well, that's all for today. Off to do the ritual, get a work-out in and start wrapping presents, yay!:) Have a wonderful day and thanks so much for stopping by:)

Thursday, November 27, 2014

A YEAR OF FAVORS-4TH OF JULY:

Hello there! Happy Thanksgiving:) Sorry this is so late in the day, but it's been a busy one:) For July 4th I got a bucket from KFC and filled it with Chex Chocolate Caramel Crunch~I think that's what it's called...we just refer to it as crack. It's Dominique's favorite.

I put Paper Pumpkin to work with some left over pinwheels from a kit this summer. They were a hit with the kids:)

I also made some little firecracker favors that I shared in a previous post in July. I put 2 Hershey nuggets together and wrapped them with a piece of Maritime DSP. Before I wrapped them with the paper, I made a fuse out of Basic Grey Cardstock and glued it to the wrapper, centering it between the nuggets. I punched out 2 stars from Gold Glimmer Paper using the Itty Bitty Accents Punch Pack and attached them to the fuse with Glue Dots.

I hope you had a wonderful Thanksgiving:) Thanks so much for stopping by! Gobble gobble...

Wednesday, November 26, 2014

A YEAR OF FAVORS-FATHER'S DAY:

Hello there! I had so much fun making this little favor and couldn't wait to share it with you. I know you won't be needing to think about Father's Day for awhile, but when you do, hopefully you'll remember this fun idea. I used the photopolymer set Calling All Heroes. Having 2 grandsons, this set was a must for me. I cut out the star using the Big Shot and Star Framelits using Basic Grey Cardstock. I used Basic Black ink for the background and sentiment.

To stamp the sentiment, I cut out a circle using the Circles Collection Framelits out of scrap cardstock. I simply lined up the letters along the curve and stamped. I stamped the other images in Real Red ink onto Real Red Cardstock, and Crushed Curry ink onto Crushed Curry Cardstock. I cut them out, adhered them together and attached with Dimensionals.

Fot the 'cape', I folded the top corners around the top of the star and punched holes in the top corners of the candy wrapper. I then strung a piece of Crushed Curry 1/8" Taffeta Ribbon through the holes and tied a knot.

Finally, I anchored the cape to the back of the star using a couple of Glue Dots. Dominique isn't really the shirt & tie or golfing kind of dad, but he is definitely a super hero to Quinten, so these worked out perfectly! We added a couple of mylar balloons and we were set. Stop back tomorrow for some fun 4th of July ideas. Thanks so much for stopping by:)

Tuesday, November 25, 2014

A YEAR OF FAVORS-GRADUATION:

Hello there! just popping in here quick to share the next occasion we helped Dominique celebrate. He got his GED while he was away, so we wanted to let him know how proud we are of him. I made a faux diploma and wrapped it with Smoky Slate Chevron Ribbon and added some Gold Sequin Trim.

Iused the stamp set Something To Say and stamped the sentiment in Basic Grey ink onto Brushed Gold & Brushed Silver Cardstock. I then made some favors by wrapping Hershey nuggets with Smoky Slate Cardstock. I cut a 1 1/2" square out of the same cardstock and folded a piece of Smoky Slate 1/8" Taffeta Ribbon in half. I poked a hole to the center of the cap using the Paper-piercing Mat & Tool and attached the ribbon with a Candy Dot Brad Base. I added a Neutrals Candy Dot to the center and attached with a Dimensional.

Make sure to stop back tomorrow for a super fun idea for Father's Day. Thanks so much for stopping by:)

Monday, November 24, 2014

A YEAR OF FAVORS-EASTER:

Hello there! Working my way through the holidays and occasions of the year. Today's project isn't too exciting, but does show you how to whip up a tiny banner if you need one.

I had a heck of a time coming up with an Easter basket this time of year, but some kind soul on Facebook came to the rescue:) I used Strawberry Slush, Pear Pizzazz, Marina Mist, Daffodil Delight, and Wisteria Wonder Cardstock and punched out little pennants using the Banner Punch. Next I stamped out Happy Easter using the Simply Serif Mini Alphabet in Chocolate Chip and punched out the letters with the 1/2" Circle Punch. I used the Paper-piercing Mat & Tool to poke holes at the tops of the pennants and strung baker's twine through to make a banner. I can't remember which color I used-probably Old Olive? Then I just filled the eggs with Dominique's favorite candy-Laffy Taffy:)

Now here's something that's a lot more exciting: The Online Extravaganza starts today! You can save up to 50% on products today through Monday, December 1st. And there are 3 Door Busters which are in effect for TODAY ONLY! Get Embossing Folders for only $5(excludes Stylish Stripes, Chevron, Beautifully Baroque & Woodgrain).
Get the Gift Box Punch Board at 30% off: $13.96 instead of $19.95!
Get the Everday Occasions & Hip Hip Hooray Cardmaking Kits both for $34.93-regularly $49.90. See everything here:  http://www.stampinup.com/ECWeb/CategoryPage.aspx?categoryid=2013


I'll be putting in an order at the end of the day, so let me know ASAP if there's anything you're interested in. These deals are as supplies last, so let me know soon so you don't miss out on these fantastic deals! Thanks so much for stopping by:)

Sunday, November 23, 2014

A YEAR OF FAVORS-ST. PATRICK'S DAY:

Hello there! On to St. Patrick's Day. I made a banner using Garden Green Cardstock and the Metro Type Alphabet stamp set. I used the 1 1/4" Circle Punch along with the Hearts Collection Framelits. I scored the hearts down the middle and used the Bird Builder Punch for the stems.


 I folded several Tea Lace Paper Doilies in half and strung a piece of Old Olive Baker's Twine through them. I adhered the 4-leaf clovers to them and added some Gold Trim Sequins. For a little extra good luck, I added the little horseshoes to the ends with the set A Fitting Occasion. I used Basic Grey ink onto Brushed Silver Cardstock, cut them out and tied them to the ends.

For extra fun, I added Lucky Charms to my Rice Krispy Treats:) I added green food coloring to the melted butter and Rice Krispies. After I mixed them up, I added about 3/4 cup of Lucky Charm marshmallows and mixed them in. I sprinkled some on top as well. Extra yummy:) Check back in tomorrow for an Easter idea. Thanks so much for stopping by:)


Saturday, November 22, 2014

A YEAR OF FAVORS-VALENTINE'S DAY:

Hello there! As I mentioned yesterday, we had a surprise birthday party for Dominique and also celebrated all the holidays and occasions he missed for the past 2 1/2 years. Here's what I came up with for Valentine's Day.

We had the intentions to buy stuff for every holiday that came along and save it til Dominique got home, but that didn't happen. So I had to make my own box of chocolates. Oh, who am I kidding? As if I could have kept a box of chocolates around for 2 1/2 years. I used the Hearts Collection Framelits along with the Big Shot to cut out 2 of the scalloped hearts using Red Glimmer Paper.

I took a long 1 1/2", strip of Real Red Cardstock, scored and folded at 1/4" along both edges, and cut notches about every 1/2 inch. I used Liquid Tombow to attach to the heart pieces to make a box, which I filled with candy of course. I made a banner out of Whisper White Cardstock and used an oldie, but goodie alphabet set~Go Go Boots. I cut his name out of Early Espresso Cardstock and adhered the banner with Dimensionals. I added a bow made with Cherry Cobbler Baker's Twine.

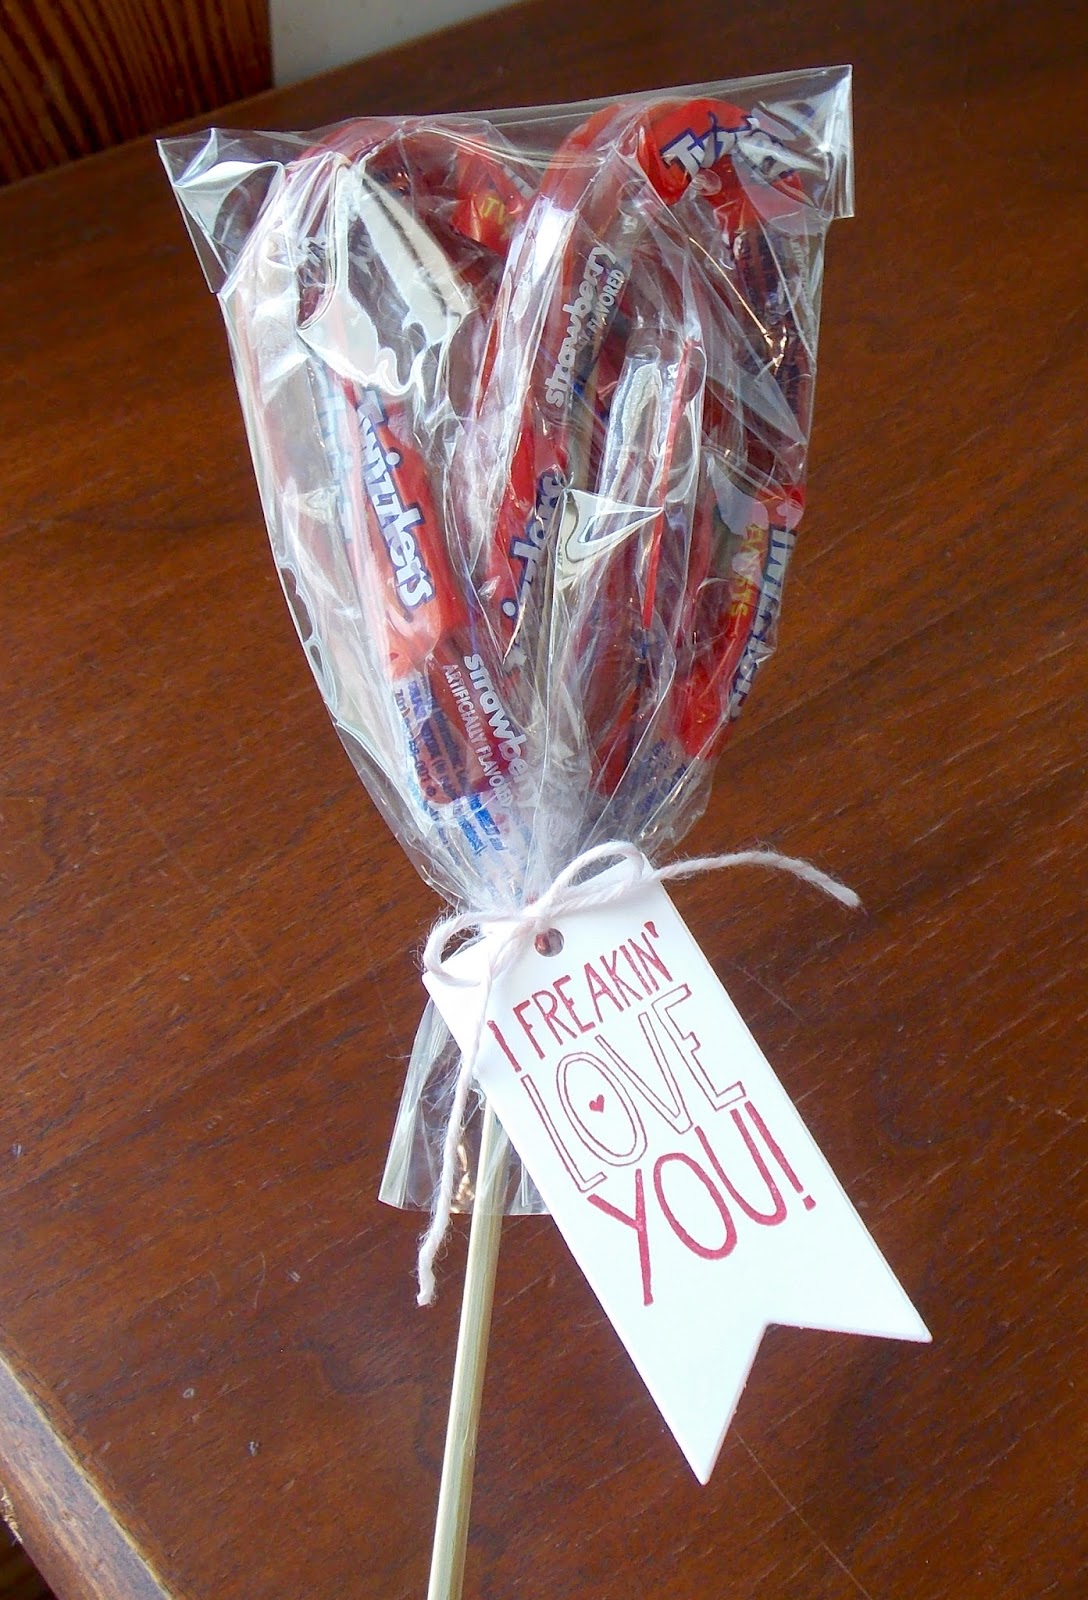
And here's where I really outdid myself:) I was planning on making little treat bags with bite-sized pieces of Twizzlers licorice but I accidentally grabbed the long pieces:( But it ended up being a great thing, cuz I was able to make these sweet hearts on a stick:)

I foled 2 pieces of Twizzlers in half for one side of the heart, 2 more for the other side and carefully slid them into a Cellophane Bag. The older ones we used to carry worked best, but the current 4" x 6" Cellophane bags worked too. I gathered the bottom of the bag together and cinched it as tight as I could  I tied a piece of Blushing Bride Baker's Twine around it and added a tag made with the set Yippee-Skippee! I stamped the sentiment onto Whisper White cardstock using Real Red ink and cut it out with the Banners Framelits.

I then simply stuck a skewer up through the bag and put a bunch in a vase. Sometimes our mistakes end up being a really good thing:)

Stop back tomorrow and see what I made for St. Patrick's Day. Thanks so much for stopping by:)

Friday, November 21, 2014

DOMINIQUE'S SURPRISE PARTY:


Hello there! As I mentioned earlier, I had a special birthday party that I made a lot of favors for. The birthday boy was Dominique, Quinten's father. He's been away for the past 2 1/2 years, so we included all the holidays and occasions he'd missed while being gone. I made a banner using the Celebration Basics Kit and Bermuda Bay Add-On Kit.


Apparently my husband was drunk when he took these pictures, but thankfully I took some at home:) I started with new year's and worked my way to Christmas. We got some hats and noisemakers and fancy glasses(at the dollar store:) and Welch's Sparling Grape Juice. The little ones all thought they were drinking champagne:)

I made a bigger scale easel card of the one I shared yesterday and just used chalk to write on the Basic Black Cardstock.

Stop back tomorrow and see some fun ideas for Valentine's Day. Thanks so much for stopping by:)

Thursday, November 20, 2014

BIG NEWS EASEL CARD:

Hello there! I was needing a wedding card a couple of months ago and the bride used the popular chalkboard theme. I remembered Becky Roberts had a really cool chalkboard easel card and I used her design. You can see her amazing designs here: http://www.inkingidaho.blogspot.com/2013/03/chalkboard-card-tutorial.html
I pretty much followed her instructions except I cut longer pieces for the horizontal strips and layered the vertical strips on top. I used a Basic Black base and the wood was made with the Hardwood Background Stamp. I stamped the image in Soft Suede ink onto Soft Suede Cardstock and cut 2 strips at 5 1/2" x 1/2" and 2 strips at 6" x 1/2" and cut off the excess.

I used Whisper White Craft ink and heat embossed the sentiment with White Embossing Powder. I used the Stamp-a-ma-jig to get the sentiment centered, being careful to leave at least 1/2" on all sides. I found it easiest to do the stamping and embossing before adhereing the wood frame. I used a Sponge Dauber in the Whisper White Craft ink to achieve the chalkboard technique.

Next, I punched out banners from Back To Black DSP using the Banner Punch. I used the Paper-piercing Tool & Mat to poke holes in the top of one of the banners, and laid it on top as a template for the rest. I added a bit of tacky glue to the ends of a piece of Basic Black Baker's Twine and twisted the ends to form a sharp point to ease in threading the twine through the holes. I poked holes in the top corners of the easel and attached the banner with Mini Brads. I added a couple of little bows to each side and attached with Glue Dots. I finished it off with a Blushing Bride heart punched with the Itty Bitty Accents Punch Pack and adorned it with a Basic Rhinestone. Many thanks go out to Becky for her awesome design and directions:) Thanks so much for stopping by. I've got lots more to share with you:)

Wednesday, November 19, 2014

OCCASIONS 4 YOU CARD:

Hello there! Here's another card from Card Night to share with you. I got a little help from our demonstrator magazine Stampin' Success. I used the sets Occasions For You, Gorgeous Grunge & Dotty Angles. I started with a Very Vanilla base and stamped the bottom with Crushed Curry ink. I added a tiny strip of Flashback DSP to the top and then stamped the splattered images in Pool Party, Crushed Curry and Tangelo Twist.

Next I wrapped a piece of Basic Black Baker's Twine twice around the card and tied a bow. I ran a piece of Tangelo Twist Cardstock through the Big Shot using the Stars Framelits and the Eclectic Paper-piercing Pack, mat & Tool. I stamped the sentiment onto Very Vanilla using Pool Party, cut it out and popped it up with Dimensionals. I finished off the card with an Essentials Wooden Element topped with a Neutrals Candy Dot.

I have 1 more card to share with you tomorrow and then I have lots of favors from the birthday party to share with you:) Thanks so much for stopping by!

Tuesday, November 18, 2014

GIGGLE GREETINGS CARD:

Hello there! Here's another card from Club Card Night using Giggle Greetings. This is one of my favorite sets in the catalog and I plan to put every stamp in the set to work. I started with a Crumb Cake base and added a layer of So Saffron Cardstock that I ran through the Big Shot using the Decorative Dots Embossing Folder and I adhered it with Dimensionals. On top of that I added a layer of Maritime DSP that I rounded the corners with using the Project Life Corner Punch.

I stamped the image on Whisper White Cardstock using Black StazOn ink and colored with So Saffron, Pool Party and Real Red Markers. I rounded the corners as well and added some Beach House Washi Tape. I finished it off with a piece of coiled Crushed Curry Baker's Twine that I topped off with a Subtles Button. I figured this is the season for a get well card, so I used the sentiment Sorry You're Sick! Get better quick! on the inside from Fabulous Four.

I just got home from a surprise birthday party that I made a TON of favors for and can't wait to share them all with you. Stay tuned...Thanks so much for stopping by!

Monday, November 17, 2014

WONDROUS WREATH CARD:

Hello there! Over the next 4 days I'll be sharing the cards we made at Club Card Night with you. This card was made with Wondrous Wreath and the coordinating Wonderful Wreath Framelits~you save 15% if you Bundle and buy them both:) I started with a Lost Lagoon base and added a layer of Smoky Slate Cardstock that I ran through the Big Shot using the lovely Filigree Frame Embossing Folder.

I first stamped the wreath in Soft Sky onto Whisper White Cardstock. I then did the 2nd layer in Pear Pizzazz, being careful to keep the tabs on the stamps at the top center. Next I cut out the wreath, and here is where it gets a little tricky. SU! reccommends cutting the center of the wreath out first and then do the stamping, but I had no success with that. What I did was use the center framelit piece and centered it on the wreath as best as I could~it's hard to tell because you can't see through it. I then used a pencil and lightly traced around the framelit. Then I could tell if I needed to shift it a bit. Once I got the framelit where I wanted it, I ran it through the Big Shot and it cut the center of the wreath center out along with the pencil lines:)

Once it was all stamped and cut out, I added the berries image with Silver Metallic Encore ink. It takes a little longer to dry and this way it won't get silver ink on the framelits and transfer onto a project that you don't want silver ink on:) I then stamped the sentiment in Lost Lagoon ink onto Vellum Cardstock and let it sit a bit to dry. I added a bow made from Lost Lagoon Silky Taffeta Ribbon and attached it with a Glue Dot. I added the wreath to the card front with Dimensionals and added the banner with Glue Dots. I strategically hid the Glue Dots under the sequin and bow. I sprinkled a couple more Frosted Sequins and adhered them with Glue Dots as well. I hope this card helps you get in the holiday spirit if you're not already there:) Thanks so much for stopping by! See you again tomorrow:)

Sunday, November 16, 2014

UNDER THE TREE PRIMITIVE TREES:

Hello there! As promised, here's some more details on how I made these primitive trees using Under the Tree Specialty DSP. I got 2 different sized foam cones at Wal-Mart. After much trial and error, I found the best way to adhere the paper was with Sticky Strip. The DSP is thicker than our regular DSP, so I had to gently conform it around the cones a bit to loosen it up a little. I got the paper in place and traced around the bottom of the cone onto the inside of the DSP with a pencil, and cut the excess paper off.

I then ran Sticky Strip around all the edges and adhered the paper to the cone. Next I stuck a skewer up through the center of the bottom of the cone. I had to use a hammer to get the skewer in as far as I needed. Next I stamped out Merry Christmas onto left over kraft cardstock that came with the Many Merry Stars Kit using Cherry Cobbler ink. I used the Simply Serif Mini Alphabet and used the Banner Punch to cut them out. I strung the sentiment on Cherry Cobbler Baker's Twine and attached to the tree using pearl stick pins that I colored with the darkest Night of Navy Blendability Marker earlier.

I needed something to cover the top of the cone that didn't get covered with DSP, and I remembered that I had some Mini Reeses Peanut Butter Cups left over from Halloween~remarkably! and the little wrappers worker perfectly:) I attached them with Liquid Tombow, and if you adhere them before you insert the skewer, they stick pretty good after they've been turned upside down and hammered on. Next, I ran some Crushed Curry Cardstock through the Big Shot using the Stars Framelits. I used the Eclectic Paper-piercing Pack & Tool, using the under side of the cardstock, which resembled punched tin. I used a sponge dauber in Chocolate Chip ink to age it a bit and added a thin piping of Liquid Tombow around the edges, leaving a little opening at the bottom and glued together. I then inserted a toothpick inside and stuck it to the top of the tree.

SU! doesn't currently have any ribbon that I liked for the trees so I had to use contraband~the horror! I again aged it with a dauber and Chocolate Chip ink. I tied a bow around the top and secured it with a couple of straight pins under the loops. Next I added a little bit of garland to the bottom of the trees using Baked Brown Sugar Thick Baker's Twine and a thin line of Liquid Tombow Glue. I found the cute little burlap bags at Hobby Lobby and cut the seam on the bottom as they wobbled. I found some florist clay~sorry, don't know the official name since it's on the wrapper inside the tree:( But it's green, feels like clay and is pretty heavy to work as a base. I cut the block of clay in half and rounded it a bit. I stuck the burlap bag over the top of the clay and then inserted the tree.

These were a little more finicky and time-consuming than I thought they'd be, but then again, I didn't start on them til the night before the event, so that might have been some of the problem. But I loved how they turned out and love how they work with the Many Merry Stars Kit. Thanks so much for stopping by and I'll see you back here tomorrow:)