Wednesday, October 31, 2012

GHOULISH GOOGLIES DESIGNER KIT:

Happy Halloween! I'm sorry I've TRICKED you into thinking I'd post more this month, but I have some TREATS to share with you today using the Ghoulish Googlies Designer Kit. My grandson, Gabriel and I made these cute little  treat bags for his class.

We used everything that came with the kit-glassine bags, tags, googlie eyes and exclusive Pumpkin Pie Baker's Twine.

We also added some of the spooky Striped Satin Ribbon at the top and attached some of the Printed Designer Brads.


We alternated some of the Pumpkin Pie Baker's Twine with Lucky Limeade and added a Pumpkin Pie tag to each bag. We used Ghoulish Ghouls for the sentiment and most of the tags.

Gabe was in charge of stuffing the bags and he crammed as much as he could get into them. Each bag held 4 pieces of candy, but you could get more into them if you don't fold down the top of the bag.


We also used the set Monster Munchies because the little owl was just too cute not to use!


We had a lot of fun making these little bags and they were a hit! Think about getting some of these kits now and have them ready to go for next year! I hope you have a fun night of trick & treating! Thanks so much for coming by!

Saturday, October 20, 2012

MOVING FORWARD CASE:

Hello there! This is a card that I CASED from Sarah Sagert and Heather Summers. You can see the originals on Heather's blog at www.stampwithheather.ca. This card is made with the Ronald McDonald House set Moving Forward. SU! donates $3 to RMHC with every purchase of this set. They've donated over $1,000,000 so far to this charity-that's one more reason to love this set! And I love this card! The layout, the colors-everything! I changed things up a tiny bit, but I knew I had to make one when I saw it. I used a Crumb Cake base and stamped the background with the set Confetti in Crumb Cake ink. I stamped the blimp image in Melon Mambo onto Whisper White Cardstock that was run through the Big Shot with one of the Labels Collection Framelits. I then stamped another blimp in Pumpkin Pie, cut it out and attached it to the Framelit with Dimensionals.

I added a Brights brad to the propeller and a Melon Mambo banner. I also stamped some Pool Party clouds in the background with the set Up, Up & Away. On the inside I used the sentiment 'Up in the air over you!' from the same set. Next, I ran a piece of Daffodil Delight through the Big Shot with the Argyle Embossing Folder. I added a strip of Old Olive that was punched with the Dotted Scallop Ribbon Border Punch and adhered it underneath. I then tore a piece of Melon Mambo DSP from the Paper Stack, pleated it and attached it under the Daffodil Delight. I wrapped a piece of Pool Party Ruffled Ribbon around the card and topped it off with an Old Olive Button. I wish I could take credit for this adorable card. I hope you like it as much as I do. Thanks so much for coming by!

Friday, October 19, 2012

FULL OF BLESSINGS CARD:

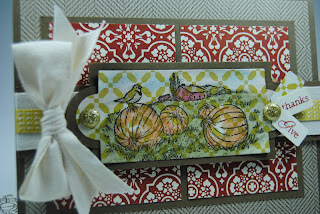
Hi there. Today I have a card for you that is made with the set Full of Blessings, which can be found in the Holiday Catalog. I used a Soft Suede base and added some Comfort Cafe DSP. I stamped the pumpkin image onto a piece of DSP as well. I stamped the image in Soft Suede and colored it in with Watercolor Wonder Crayons and blended it with a Blender Pen.

I used the Cotton Ribbon and layered some Summer Starfruit Stitched Satin Ribbon on top. I added a pair of Glimmer Brads to the image which was cut out with the Apothecary Accents Framelits with the help of the Big Shot. You'll notice that the Framelit shape has a Soft Suede layer underneath. To make that, I cut the Soft Suede Cardstock mat 1/4" larger on each side and I used the 1" Circle Punch to pop out 2 circles which layer perfectly underneath. I have to admit that I was quite giddy when I figured that out-it doesn't take much! Finally I added the sentiment which is from Teeny Tiny Wishes, and punched them out with the Jewelry Tag Punch. Thanks so much for stopping by! I'll see you tomorrow!

Thursday, October 18, 2012

FRENCH FOLIAGE CARD:

Hi there. Sorry I missed a few days-still lots of painting and wallpapering going on. I can't wait to get these rooms done so I can share them with you. In the meantime, I have a few cards to share with you that we made at Club Card Night on Tuesday. This card is made with the lovely French Foliage set. I'm ashamed to say, I've had this set for about 2 years, and this is the first time it's seen ink! I've used one of the images-the blobby one-lots, but the poor leaves have been neglected until now. I truly like this set, but it's not really my style, so I've been kind of scared of it I think. But once I started working with it, it was pleasantly surprised with the result.

I used a Crumb Cake base along with the wonderful Orchard Harvest DSP. The leaf images were stamped off onto Naturals Ivory Cardstock, in shades of  Cajun Craze, More Mustard, Lucky Limeade and Early Espresso. The sentiment is from Thoughts & Prayers.  This would also make a great sympathy card, as a couple of my 'card ladies' opted to do. What's amazing about this set is how realistic the leaves look. I used Early Espresso ink on More Mustard and Cajun Craze Cardstock. I cut them out, crumpled them up a bit and attached them with Dimensionals. But they look like they came from my yard-alot of fun to make! I slid one of the new Designer Ribbon Slides onto a piece of Early Espresso Stitched Ribbon and layered a piece of Island Indigo Ruffled Ribbon underneath. I finished it off with a piece of Linen Thread that I wrapped around the Slide and knotted on the ends.  I was really pleased at how this card turned out. I hope you like it too! Thanks so much for stopping by. I'll see you tomorrow!

Sunday, October 14, 2012

POT OF BLUE & GOLD DECORATIONS:

Hello there! One of our local schools has a fundraiser every year called the Pot of Blue & Gold drawing, in which you have a chance to win $100,000. My mom is on the decorating committee, so that means I'm on the decorating committee as well! They went with a pennant theme this year, but last year's was better-Margaritaville. Talk about a FUNdraiser!

I used 12x12 sheets of Night of Navy and Daffodil Delight Cardstock, and cut out several pennants. I added some detail using Midnight Muse Stitched Satin and Daffodil Delight Stitched Ribbon. I used the Designer Rosette Die with the Big Shot for the medallions, or rosettes. I used the 21/2" Circle Punch for the Night of Navy circle and layered it with a Whisper White circle cut out with the 3" Circle Die.

I used a variety of circle punches and the new smaller 11/4" Scallop Circle Punch on the ends. I added a gold Glimmer Brad to the center which worked perfectly with the theme. I finally got to break in my Typeset Aplhabet Die, which gave me the perfect sized letters for this project.

This was a fun project and the pennants came together pretty quickly. I also made some smaller pennants and attached them to dowel rods for the tables.

I used the Perfect Pennants Die for these and A Fitting Occasion stamp set.

I finished the smaller pennant off with s Designer Button and White Baker's Twine. These would also work great for a Class Reunion or Graduation party. Thanks so much for coming by today!

Saturday, October 13, 2012

PETITE PURSE PUMPKIN:

Hello there! Here's a cute little jack that I made for my hostess this month using the Petite Purse Die. The fun Sweater Trim makes a perfect handle for this tiny goodie bag.

I used a piece of Summer Smooches DSP and ran it through the Big Shot. Before I assembled the purse, I cut out the pumpkin's nose and mouth with an Xacto knife, and added a piece of Basic Black cardstock behind it. You could easily just stamp a face using the Jack of All Trades or Got Treats set, but I tend to usually make things much harder than they need to be! I cut the flap part off of the purse and adhered it inside to cover up the black cardstock piece. The flap gave me a little 'stem' that I could wrap a piece of Lucky Limeade Baker's Twine around. I put a little glue on the twine and wrapped it around a dowel for a couple minutes to curl it. I added a couple of Googlies and a tag made with Teeny Tiny Wishes and punched it out with the Jewelry Tag Punch. I filled the pumpkin with Rolos, although you can't really see them.....I think my grandson raided it! I hope you enjoyed my little treat for you. Thanks so much for stopping by!

Friday, October 12, 2012

MIXED BUNCH CARD:

Well, we made it-it's Friday! And I don't need to babysit today-so I get to paint-YAY! I got the inspiration for this card from my Stampin' Success demo magazine-I just changed the colors up for Fall. I used a Crumb Cake base and stamped the various flowers in the background with Versamark. Next I added a Riding Hood Red backdrop that was run through the Big Shot using the Perfect Polka Dots Embossing Folder. I stamped the big flower in Midnight Muse onto Very Vanilla Cardstock and punched it out with the Blossom Punch. I added some leaves behind it using the daisy-like flower, punching it out with the Blossom Punch and cutting out 2 of the sections. I adhered them with Dimensionals. Next, I stamped various images in More Mustard and Riding Hood Red, and punched them out with 1/2", 3/4" and 1" Circle Punches. I adhered them with Glue Dots and Dimensionals. Finally, I stamped the sentiment in Riding Hood Red, which is from the Loving Thoughts set and flagged the end. I added a little detail underneath with the Dotted Scallop Ribbon Punch in More Mustard. I'm normally not a big floral fan, but there's something about this card that I really like. I hope you do too! Well..off to painting...working on those before and after pictures for you. Hope to share them soon! Have a wonderful day & thanks so much for stopping by!

Thursday, October 11, 2012

YOU'RE AMAZING CARD:

Happy Thursday to you! Getting closer to Friday-although, that's when my work week starts-3 days in a row of babysitting my 9 month old grandbaby Quinten. I can do it, I can do it, I can do it.....:)
I got my inspiration for this card from Amy O'Neill.  She does amazing work! Check out her blog at: www.amyoneillblog.com.  This is a perfect guy card!


I used the stamp set You're Amazing and the Apothecary Accents Framelits which coordinate so perfectly with this set. When the Framelits were first introduced, I thought why can't we have some normal shapes? Ovals, scalloped ovals, circles. But these funky shapes work with this set. I used a Soft Suede base and stamped the sentiment on Whisper White. I colored in the stamp with Tangerine Tango, Lucky Limeade and Soft Suede. I then ran it through the Big Shot with one of the Framelits. Next I used the coordinating Essentials Paper-Piercing Pack to add some extra detail. I added some little banners at the bottom using the Summer Smooches DSP and finished it off with one of the Naturals Buttons tied with Lucky Limeade Baker's Twine. Well now I'm off to painting in the downstairs bathroom, adding a border to the upstairs bathroom, and maybe start wallpapering in the downstairs bathroom. I need to get as much done today as I can,  cuz tomorrow all I'll get done is chasing around a wild & crazy little boy! Going to be a great day! Enjoy yours too! Thanks for stopping by!

Wednesday, October 10, 2012

GOOGLY GHOULS CARD:

Hello again! So sorry for the break. I guess my crazy September ran into October too! I haven't had much of a break though...2 completely gutted bathrooms, helping my daughter paint her new house, a week-long flu, more table decorations, which I'll share soon, and chasing a 9 month old who's on the verge of walking! I finally was able to get into my stamp room today and it felt great! I've been seeing this sketch alot lately and thought it would work perfectly with this set-Googly Ghouls.

I used a Very Vanilla base and attached a fun polka dot background from the Howlstooth & Scaringbone DSP. I added the chevron pattern to a Basic Black matt and hung 3 little banners from it. Next, I stamped the witch in Basic Black onto Very Vanilla and ran it through the Big Shot using the Circles #2 Die. I then ran a piece of Basic Black through using the Perfect Pennants Die. I left a little space on the circle to add the polka dot banner and added a Regals Button tied with the special Pumpkin Pie Baker's Twine that's only available for a limited time with the Ghoulish Googlies Designer Kit. I finished off the card with a pair of Googlies and the sentiment was stamped with the Hostess set Wacky Wishes.

I've got several more projects stockpiled and some before and after pictures of the progress of our bathrooms, so make sure to check back. Thanks for hanging with me! See you tomorrow!