Sunday, December 20, 2015

WHITE CHRISTMAS CARD:

Hello there! I can't believe we're at December 20th already~I'm as giddy as my grandbabies:0. Here's my last Christmas card to share with you for the year. It's a compilation of several  stamp sets and framelits. I used White Christmas, which carried over from last year, Festive Fireplace & Happy Scenes. I used the coordinating Festive Fireside Framelits & Hearth & Home Thinlits as well. I started with a Crumb Cake base and stamped the trees from White Christmas along the bottom with Crumb Cake ink. I stamped the mantle with Crumb Cake as well onto Whisper White Cardstock and cut it out, along with the window frame and set them aside.

Next, I cut a piece of Whisper White Cardstock to fit behind the window and sponged the top 2/3's with Lost Lagoon ink and a Sponge Dauber. I then stamped the White Christmas tree image onto it using Crumb Cake ink. I stamped the car and tree image as well onto a piece of Whisper White and colored them with Real Red, Crumb Cake, Smoky Slate & Old Olive Markers. I attached the car to the scene with Glue Dots. I then cut a Window Sheet to fit over the top and stamped the snowflake window pane image from Happy Scenes with White StazOn ink onto it. I adhered the Window Sheet to the cardstock scene with Glue Dots.

I then attached the window frame over the Window Sheet with Dimensional halves. I attached the mantle to the frame with Liquid Tombow. Next I stamped the greenery with Crumb Cake ink onto Old Olive Cardstock and cut it out with the thinlits. I adhered it to the window with Liquid Tombow. I stamped the sentiment from Happy Scenes with real Red ink onto Whisper White and topped it with a Home For Christmas Button adorned with Cherry Cobbler Baker's Twine. I attached it with Glue Dots.

I finished it off with a piece of Real Red 1/8" Striped Ribbon and added a bow with Glue Dots. As I mentioned yesterday, this was my favorite Christmas card this year. It was a little more time-consuming, so I only made a few. Well...off to start my baking:) You might not see me back here for awhile, although I do have some little goodie boxes that I want to share..so stay tuned:) Thanks so much for stopping by!

Saturday, December 19, 2015

SNOW PLACE CARD:

Hello there! I've got a couple more last second cards to share with you. I finally got to play with the Snow Place/Snow Friends Bundle. I'm going to send these to my grandbabies. Yes, I did say send..I haven't mailed any yet! I started with a Soft Suede base and added a piece of Merry Moments DSP. I added another coordinating paper on top of that. I stamped the cute little snowman in Soft Suede onto the same cardstock and punched him out with a 2" Circle Punch.

I punched out the Real Red circle with a 1 1/4" Circle Punch, the Old Olive with a 1 3/4" Circle Punch, and the Whisper White snowflake with a 3/4" Circle Punch. I punched out the mini snowflakes with the Owl Builder Punch. I added Snowflake Elements to the circles with the Fine-Tip Glue Pen and added Home For Christmas Enamel Dots to the centers.

I stamped the Santa hat in Real Red onto Whisper White Cardstock and cut it out with the coordinating framelits, which I saved 15% on when I bundled:) I popped it up with a Dimensional and added a pair of sequins from the Metallics Sequin Assortment using the Fine-Tip Glue Pen.

I stamped the sentiments in Soft Suede onto Soft Suede Cardstock and adhered them. I'm hoping my little grandbabies will be excited to get some mail within the next couple of days:) I'll save my last card for tomorrow, so make sure to check back~it's my favorite:) Thanks so much for stopping by!

Thursday, December 17, 2015

PEACEFUL PINES CARDS:

Hello there! I've got another pair to share today. I used the set Peaceful Pines again and there are just so many things you can do with this set! Unfortunately I'm not gonna find out, as I'm running out of time crazy fast! For this card I started with a Basic Black base and used the Chalkboard Technique by using a Sponge Dauber in Whisper White Craft ink and smearing it all over the cardstock to resemble a chalkboard. I then added a layer of DSP from the Brights Color Collection DSP Stack.

I then added another layer of Basic Black and stamped the border with the Project Life set Seasonal Snapshot With Whisper White Craft ink. I stamped the tree onto a piece of Basic Black as well and sprinkled both with White Embossing Powder and used the Heat Tool to set. I used the coordinating Perfect Pines Framelits to cut out the tree.  I then cut out the tag with the help of the Big Shot and Chalk Talk Framelits.

I used the circle image from Pretty Thankful and centered it on the tag, heat-embossing it as well. I used the Sponge Dauber in Whisper White Craft ink to chalk up all the layers and added a piece of Real Red Pompom Trim with Everyday Chic Washi Tape to the top of the tag. I made a couple small slits in the washi tape so it would lay flat. I then tied a piece of Cherry Cobbler Baker's Twine around the tree and attached it to the tag with Dimensionals.

 I attached the tag to the base with Dimensionals and added a Real Red Cardstock star punched with the Itty Bitty Accents Punch Pack and added an Itty Bitty Accents Epoxy Sticker on top. I finished it off by stamping the tree image again in Real Red ink onto Whisper White Cardstock. I used the Word Window Punch to punch it out, and put it in the punch a second time with a post-it note to trim it down. I attached it to the tree with Dimensionals.

For this card I started with a Crumb Cake base and added a piece of Merry Moments DSP. I added a piece of Season of Cheer Washi Tape to the top of the DSP. I stamped one tree with Garden Green ink onto the same cardstock, one in Old Olive onto Old Olive and one in Whisper White Craft ink onto Mossy Meadow Cardstock. I used the Perfect Pines Framelits to cut them all out.

I adhered the trees to the DSP~ the Old Olive tree with Dimensionals. I stamped the sentiment with Mossy Meadow ink onto Crumb Cake Cardstock, punched it out with the 1 3/8" Circle Punch, and attached with Dimensionals.

I then wrapped a piece of Garden Green Striped Ribbon around the card and adhered with Glue Dots. I added a Snowflake Element over the seam with Glue Dots and added a bow to the top. I finished it off by stamping the tiny snowflakes in the background with Crumb Cake ink.

Well I'm planning on deciding which cards are going to be the fastest & easiest to knock out and hopefully make some progress today & tomorrow~although, my little buddy Q wants to help, so we'll see how far I get:) Thanks so much for stopping by:)

Wednesday, December 16, 2015

LOTS OF JOY CARD:

Hello there! Better late than never, but I'm back with a couple of cards made with the set Lots of Joy. I started with a Tip Top Taupe base and added a piece of Sweet Li'l Things DSP. I attached a piece of Watermelon Wonder Dotted Lace Trim to the back before I adhered it to the base. I then made a little hill with the Circles Framelits and Big Shot out of Hello Honey Cardstock. I ran the top circle through the Big Shot again using the Decorative Dots Embossing Folder.

I stamped the image at the bottom with Tip Top Taupe ink and added a piece of Hello Honey Striped Cotton Ribbon over the Honey cardstock and adhered to the back before attaching it to the base. I added a bow with Glue Dots. I stamped the tree image with Watermelon Wonder ink onto Very Vanilla Cardstock and punched it out with the Tree Punch. I stamped the sentiment with a Top Top Taupe Marker directly onto the DSP and onto a piece of Pool Party Cardstock.

I added a swirl of Crushed Curry Baker's Twine behind the tree with Liquid Tombow and attached with Dimensionals. I added sequins from the Metallics Sequin Assortment with the Fine-Tip Glue Pen. I thread a piece of baker's twine through one of the stars sequins, tied a knot and attached with a Glue Dot.

This was a fun change of pace from the traditional Christmas color scheme.

But traditional can be fun too, especially with these adorable plaid trees. I started with a Crumb Cake base and added a piece of Merry Moments DSP. On top of that I added a piece of Burlap Ribbon. I then tied a piece of Early Espresso Baker's Twine around the burlap and tied a bow.

I stamped the tree image 3 times with Mossy Meadow ink onto Whisper White Cardstock and punched them out with the Tree Punch. I attached them to the burlap with Dimensionals and tucked a Snowflake Element underneath the twine using Glue Dots. I added a Regals Candy Dot to the center.

I stamped the sentiment in Cherry Cobbler ink onto Whisper White Cardstock and adhered behind the trees.

I think this will be a good choice to make lots of as it was really quick & easy to put together:) I have a couple more so stop back tomorrow. Thanks so much for coming by:)

Tuesday, December 15, 2015

MORE OH, WHAT FUN CARDS:

Hello there! Back again with a couple more ideas for you using the set Oh, What Fun and Home For Christmas DSP. For this card I started with a Soft Suede base and ran it through the Big Shot using the Large Polka Dot Embossing Folder. Next I used the Scalloped Tag Topper Punch to make the tag out of the DSP. For the sentiment, I used the Note Tag Punch in Real Red Cardstock and used Early Espresso ink. I stamped the banner piece in Real Red ink onto Very Vanilla Cardstock, cut it out by hand & adhered with Dimensionals.

I then used the 1/8" Circle Handheld Punch for the hole and strung a piece of Cherry Cobbler Baker's Twine through both tags and tied a bow. I stapled a piece of the adorable Real Red Pompom Trim to the top tag. I cut out 2 of the cute little vintage deer from the DSP and attached them to a piece of coordinating DSP that I punched out with the 2" Circle Punch. Underneath that, I layered a Very Vanilla Circle Punched twice with the 2 3/8" Scallop Circle Punch~moving it off center inside the punch to make the starburst. I layered all of this onto a Metallic Foil Doily.

I finished it off with a few sequins from the Metallics Sequin Assortment. I attached them with the Fine-Tip Glue Pen.

I love this sweet little card and the nostalgic feel to it:)

I have one more to share with you today. I started with a Mossy Meadow base and stamped the border image in the same ink. I added a coordinating piece of DSP from Home For Christmas and cut out a few of the sweet little images.

Next, I made a label using the Big Shot and the Chalk Talk Framelits from Mint Macaron Cardstock. I stamped the sentiment with Mossy Meadow ink, and adhered a messy swirl behind it with Silver Metallic Thread and Liquid Tombow. I attached the label with Season of Cheer Washi Tape.

Next, I attached the church and houses with Dimensionals and added a piece of the festive Real Red 1/8" Striped Ribbon. On top of that I added a gorgeous Winter Wonderland Embellishment.

I hope these 2 cards are getting you in the mood:) I've got a bit more creating to do and them some massive mass-producing to do! Hubby's got Christmas music on and cleaning...It's A Wonderful Life:) Stop back tomorrow for a pair of cards made with the set Lots of Joy. Thanks so much for stopping by!

Monday, December 14, 2015

OH, WHAT FUN CARDS:

Hello there! Sharing a couple more cards with you today. I'm cramming as many as I can into the next few days in case there's anybody else out there like me who's needing some last minute ideas:). Both cards today and tomorrow's cards feature the stamp set Oh, What Fun and Home For Christmas DSP. They all require a little bit of cutting, but they're worth the extra effort:) Today's card was inspired...well pretty much copied exactly, from a Make & Take project from Convention.

I started with a Real Red base and stamped the sentiment with the same onto Very Vanilla Cardstock. I cut out one of the cute little Santas with my Paper Snips and adhered him with Dimensionals. I then added a piece of luxurious Very Vanilla Subtle Stripes Ribbon which I stapled in place. Underneath this, I added another coordinating piece of DSP, and then another under that. You could probably get by with just using a couple of narrow strips and adhereing each to the ends of the Pool Party paper instead of using 1 piece as I did, but I figured I'd never get it straight, especially with the diagonal design.

I finished off this adorable card with a Home For Christmas Button adorned with a Cherry Cobbler Baker's Twine bow.

Aside from the cutting, this was a super quick & easy card which would be great for any of you under the gun like me:)

Here's another fairly quick & easy card using the tree image. I started with a Real Red base again and ran it through the Big Shot using the Softly Falling Embossing Folder. I cut out the tree and presents with my Paper Snips and used the Fine-Tip Glue Pen to go over the garland. I then sprinkled it with Silver Glitter and set is aside to dry. I masked off the bottom of the banner image with a post-it note and inked the stamp with Delightful Dijon ink. I removed the post-it note and stamped the starburst image at the top of the cardstock.

I adhered the Delightful Dijon piece to another coordinating design of Home For Christmas DSP, and then a piece of Schoolhouse DSP underneath that. I then attached the tree and some of the presents with Dimensionals. I stamped the sentiment in Real Red onto Very Vanilla Cardstock and attached with Dimensionals as well.

Next, I thread a piece of Linen Thread through one of the Home For Christmas Buttons and attached it with Glue Dots. Under the sentiment I added a 1/4" Silver Ribbon bow to a Very Vintage Button and attached with a Dimensional. I found the layout for this card design on Pinterest but forgot to write down who made it~sorry:(

I hope these are giving you some last-minute inspiration for your cards or gift-giving. And I really hope I'm not the only one doing all of this last minute! And remember...there's still time to get these products before they retire...some up to 60% off! Go to : www.lauramellinger.stampinup.net to get them before they're gone!  Make sure to stop back tomorrow for a couple more cards made with this stamp set and DSP. I'm hoping to get a couple Peaceful Pines, Snow Place & Lots of Joy cards out soon as well...we'll see! Thanks so much for stopping by:)

Saturday, December 12, 2015

FESTIVE FIREPLACE CARDS:

Hello there! Back with another two-fer for you today:) I used the set Festive Fireplace and the coordinating Festive Fireside Framelits. If you buy the Bundle, you save 15%, but only til January 4th or while supplies last. I basically duplicated the sample in the Holiday Catalog but changed up the color scheme and made it 'old school' (like me:). I started with a Very Vanilla base and added Venetian Crochet Trim to both sides of a piece of Home For Christmas DSP.

I stamped the fireplace image in Early Espresso ink onto Cherry Cobbler Cardstock, and I used the Hearth & Home Thinlits to cut it out. It doesn't line up exactly, but I made sure the bottom trim work lined up and then cut out the window frame insert with Paper Snips. I cut a piece of Basic Grey Cardstock to the size of the fireplace width, sponged it with Basic Black ink and a Sponge Dauber, and adhered it to the back. I stamped the mantle in Early Espresso ink onto Chocolate Chip Cardstock and cut it out with the Hearth & Home Thinlits as well.

I stamped the log image with Early Espresso ink onto Chocolate Chip Cardstock and sponged it with Basic Black ink and a Sponge Dauber. I then stamped the flames with Early Espresso as well onto Hello Honey Cardstock. I used Pumpkin Pie & Cherry Cobbler inks with Sponge Daubers around the edges. I used the Festive Fireside Framelits to cut out each piece and layered them using Dimensionals. Next I stamped the greenery and wreath with Early Espresso ink onto Old Olive Cardstock and used the Festive Fireside Framelits to cut them out. I stamped the pinecones onto Chocolate Chip Cardstock, cut them out and attached to the garland using Liquid Tombow. I stamped the bow in Cherry Cobbler onto Very Vanilla and used the same framelits to cut it out.

I finished it off with a sentiment from the stamp set in Cherry Cobbler ink onto Very Vanilla Cardstock and added a row of Basic Pearls. While I like the sample in the catalog, I love the charm & character & warmth of this card...which conveys my kind of Christmas.

And here's another version using the same Bundle. I started with a Pool Party base and added a layer of Home For Christmas DSP. I stamped the mantle piece and stockings in real Red ink onto Whisper White Cardstock. I used the Festive Fireside and Hearth & Home Thinlits to cut them out. I stamped the garland with Wild Wasabi ink onto the same cardstock and used the Festive framelits to cut it out.

I tied a piece of Cherry Cobbler Baker's Twine around the garland and added a few Home For Christmas Enamel Dots. I used a Real Red Marker to color in the stockings and attached them and the garland with Dimensionals.

The sentiment is from Oh, What Fun~one of my faves from the Holiday Catalog, in Real Red ink. I scattered around a few sequins from the Metallics Sequin Assortment using the awesome Fine-Tip Glue Pen.

This was a super quick & easy card to whip up in no time, which is what I'm going to need since I haven't even started on mine! Again, I love how 1 stamp set can be so versatlie and give you totally different styles:)

Remember to check out the Year-End Sale here:  www.lauramellinger.stampinup.net . Click on Shop Now and then on Year-End Sale to save up to 60%! Let me know by Sunday night if you'd like to add to my order going in.

Thanks so much for stopping by!

Friday, December 11, 2015

TO YOU & YOURS TOO CARDS:

Hello there! Wow, I had planned on posting some Christmas cards well before December 11th, but life has been extra nutty lately! We went to Minneapolis last week to work in the Processing Center for Operation Christmas Child and of course we had to hit Mall of America when we were there. The rest of the week was being a shoulder to cry on for several loved ones in my family who are going through some rough times. I'm thankful that I was able to lend an ear and kleenex and some wine:) Then yesterday, I got a call that my youngest brother had a heart attack. Everything looked fine when the doctors went in, so we're wondering what had happened? We're just thankful things turned out how they did:)

So, last night was the first chance I've had to dust off some stamp sets and hopefully get a massive amount of Christmas cards made and mailed in the next week~wish me luck! This card was made with the set To You & Yours. And Sara had it right at Convention when she said this was a weird set. That was my first thought also when I saw it in the Holiday Catalog. But there's so much I really like about this set...the fonts of the sentiments, the primitive looking tree and the star images. The silhouette image seemed kinda out of place to me, but Sara made a really pretty card with it on stage and I stole some of her ideas:)

I started with a Soft Sky base and ran it through the Big Shot using the Lucky Stars Embossing Folder. I then sponged the stars with White Craft ink and a Sponge Dauber to make them pop a bit. Next I added a layer of Dazzling Diamonds Glimmer Paper to add some gorgeous sparkle. I stamped the background stars in Whisper White onto a piece of Smoky Slate Cardstock, and then the silhouette image onto a piece of Vellum Cardstock. I attached the vellum by adding Glue Dots to the edges of the Smoky Slate and covered it all with a Whisper White frame, made with the Square Framelit Dies.

I added some Whisper White craft ink to the Snowflake Element with a Sponge Dauber and then added a Winter Wonderland Embellishment on top when it was dry. I stamped the sentiment with Basic Grey Archival ink onto a strip of Smoky Slate Cardstock and layered a piece of Everyday Chic Washi Tape underneath.

I added a messy swirl of Silver Metallic Thread to the back of the snowflake with Liquid Tombow and adhered the snowflake to the frame using Glue Dots.

I was feeling guilty for being away for so long, so I thought I'd share 2 cards today:) I used the same set~To You & Yours, but this card has a totally different look. I started with a Crumb Cake base a added a layer of Merry Moments DSP.

Next I stamped the tree image with Soft Suede ink onto Mossy Meadow Cardstock, and cut it out with the Perfect Pines Framelits. I stamped the base in Soft Suede as well onto Crumb Cake Cardstock, and cut it out by hand. I stamped the sentiment in Cherry Cobbler onto Whisper White Cardstock and stapled it to the cardstock. Once I had everything laid out where I wanted it, I stamped the star background using Soft Suede ink. I tied a bow around the cardstock using Cherry Cobbler Thick Baker's Twine and adhered the smaller Crumb Cake piece with Dimensionals. I attached the tree & base with Dimensionals as well.

I used the Cupcake Builder Punch to make the ornaments on the tree with Soft Suede Cardstock. I had Cherry Cobbler ornaments  initially, but it was too gawdy to me so I had to yank them off. I tied a piece of Linen Thread through one of the Home For Christmas Buttons, and added it to the top of the tree using Glue Dots.

So what started out as a weird looking set, turned out to be a really versatile set~I love when that happens:)

Also, I wanted to let you know about the YEAR-END SALE that is going on through January 4th. Some of the Holiday Catalog items have been discouned up to 40% off,  and more Clearance Rack items have been added-up to 60% off! Check it out here:

http://www.stampinup.com/ECWeb/ItemList.aspx?categoryid=100300
Or go to: www.lauramellinger.stampinup.net

As always, these deals are as supplies last, so if you're wanting to take advantage of the savings, you better act fast. I'll be putting in an order on Sunday night, so if you're wanting anything, please let me know ASAP!

I wanted to leave you with a few photos of what we've been up to lately:

We collected all the leftovers and had our own Packing Party to fill shoeboxes for Operation Christmas Child. Both of our dads came and helped:)


Can you find Q?


We ended up packing over 100 shoeboxes!

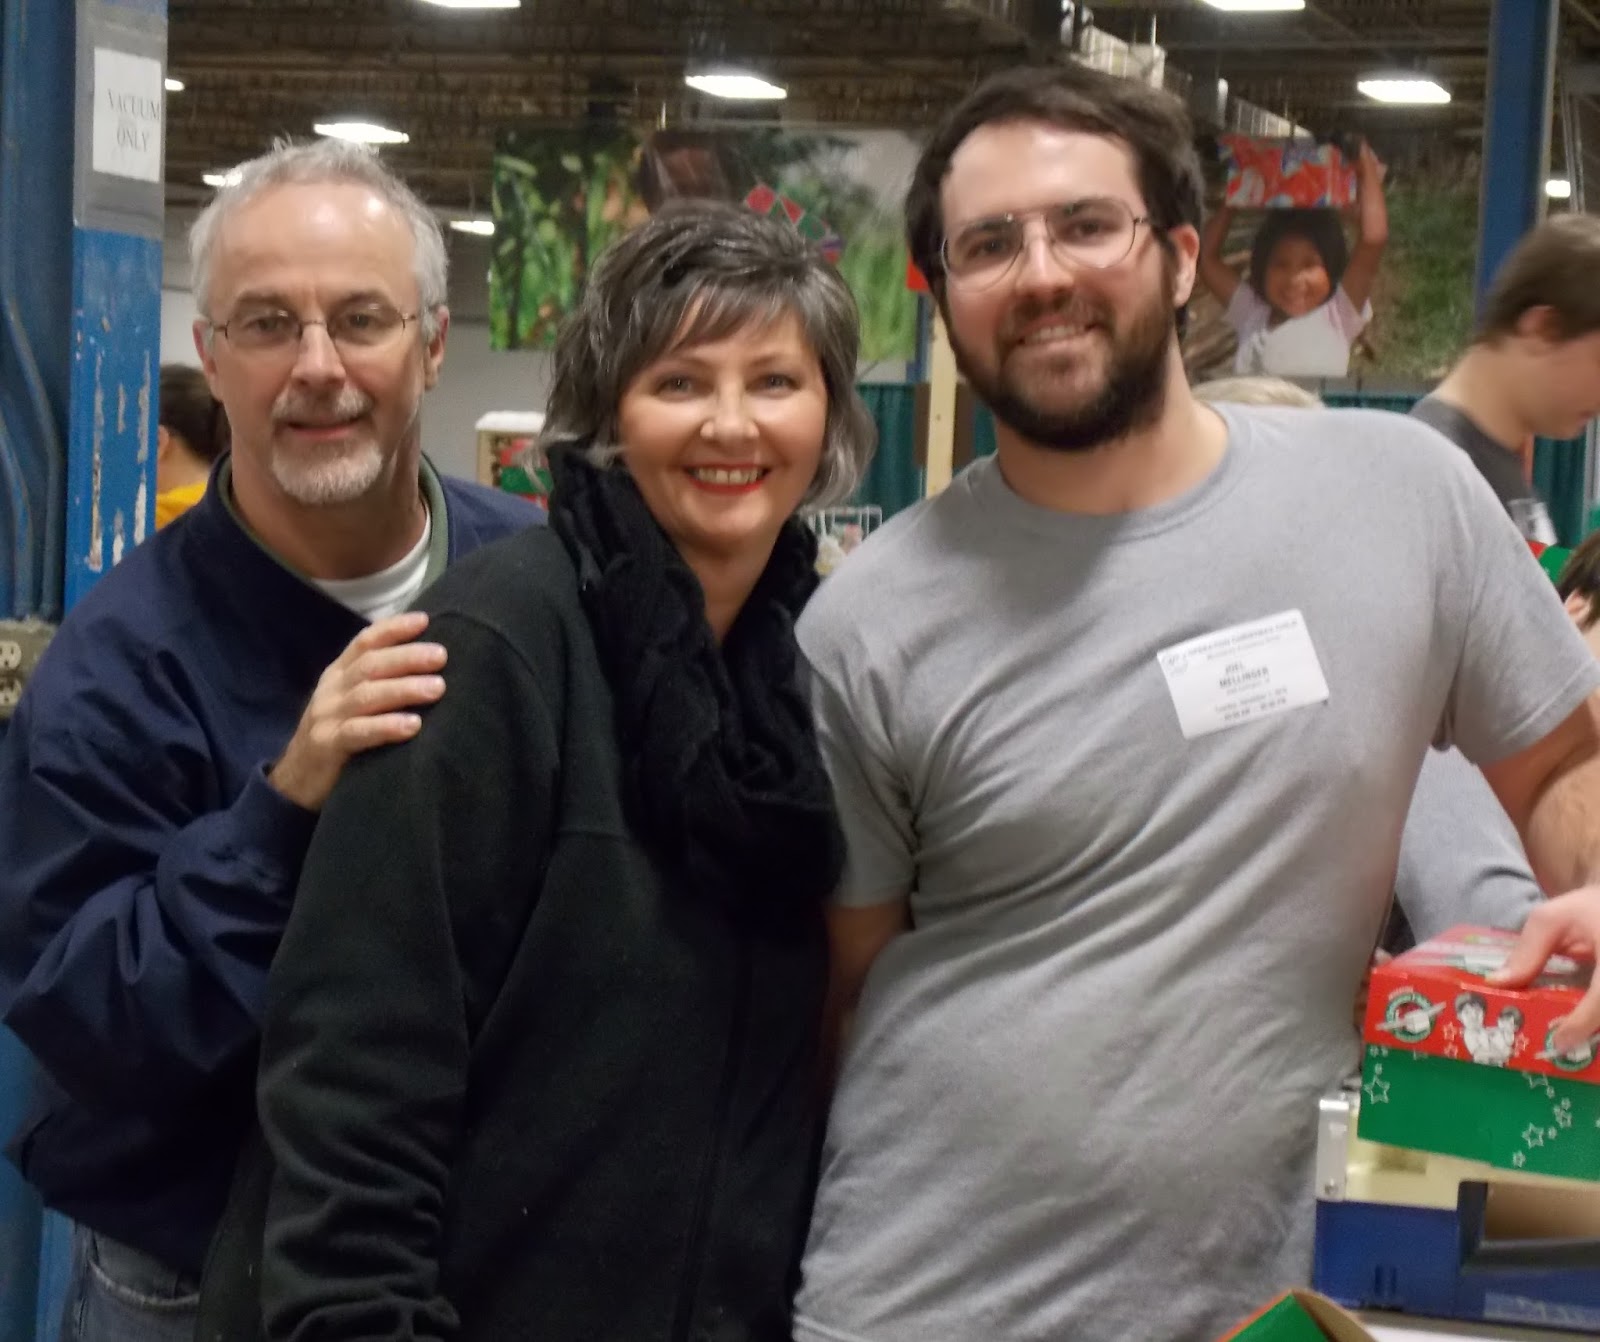
Then we were off to Minneapolis to work at the Processing Center.

Our poor Joel has a broken heart here:(, but it's amazing how helping someone else out takes your mind off of things for awhile:)

Welp I've only got a few hours to try to get some cards made before 2 of our little elves come and hang out with us tonight. And speaking of elves...

We've been trying to catch one!

Drats! That sneaky one got away with the cookie again! Maybe tonight.....

Stop back tomorrow for a pair of cards made with Festive Fireplace. Thanks so much for stopping by:)