Sunday, June 30, 2013

BRIGHT BLOSSOMS CARD:

Hello there! Happy Sunny Sunday to you! Here's a happy card sure to put a smile on your face:) I need to think happy thoughts today. As you may know, I entered the Artisan Contest this year, and many of the finalists were notified on Friday. I didn't get a call:( But actually, it's really okay. I already have a pretty full plate, and can barely keep up with what I'm doing now. And I got some really exciting news earlier in the week. Melanie from Paper Crafters Sampler asked if I'd like to be on the design team for this online publication. I was more than a little nervous to commit in case I was selected for the Artisan Design Team, which means coming up with 4 projects each month, 200 wedding invitations and who knows how many favors to make,  and of course the daily drama of living with a 1 1/2 year old. So I think the good Lord was probably saving me from a nervous breakdown! You can see the Paper Crafter's Sampler website here: http://papercrafterssampler.blogspot.com/. I'll let you know more once I figure out what I'm doing. Okay, on to today's card...I used the fun set Bright Blossoms and a great new set called A Dozen Thoughts. I started with a Basic Grey base and used the Simply Scored and Borders Plate for the detail on the edge. I stamped the sentiment in Whisper White Craft ink and embossed it with White Embossing Powder.


I added a strip of DSP from I Am Me and flagged teh bottom. Next, I used the Big Shot and Squares Collection Framelits to cut out a large Whisper White square and 4 small squares in So Saffron, Real Red, Calypso Coral and Pool Party. I created a sweet little ric-rac, or rick-rack, I'm never sure which is right, border with the Tasteful Trim Die. I stamped the images in the same inks as the paper, with the addition of Old Olive for the leaves, and the Stamp-a-ma-jig to get everything in the right place.I added a piece of Calypso Coral Baker's Twine and tied it in a bow and then used the 1" Circle Punch to punch them out and popped them up on their squares with Dimensionals. I couldn't resist adding the Candy Dots in Brights and Subtles, and the trio of tiny Subtles Buttons.

This was a fun card to make and I hope it brings a little sunshine into your day! Make sure to stay put and check out the cards for this month's 'Kits/Cards To Go'. There are 11 to choose from this month. Please email me your choices at lmel09@q.com and if you're wanting the Kits or Cards. Remember, you get to pick any 4 and the prices are listed on my blog homepage on the upper right hand side. Please have your selections to me by Friday, July 5th. The # for each card is listed ABOVE it:

                                                                                1)
 
 
2)
 
 
3)
 
 
4)
 
 
5)
 
 
6)
 
 
7)
 
 
8)
 
 
9)
 
 
10)
 
 
11)
 
Okay, those are  your 11 choices. Remember, pick any 4 and let me know if you want the Kit or Cards. And let me know by Friday, July 5th. Thanks so much for stopping by!


Saturday, June 29, 2013

EX LIBRIS CARD:

Hello there! Nothing new here to share today-all oldies, but goodies:) I used the background stamp Ex Libris, which I got awhile ago to use on samples for display boards, but I'm not sure if I ever used it. So I thought it was time to give it some love. I started with a Very Vanilla base, which I ran through the Big Shot using the Framed Tulips Embossing Folder. I inked up the stamp in So Saffron and cut it down to fit in the frame. I cut the border off the bottom and moved it to the top to give me more room for the Crumb Cake Seam Binding bow.

The sentiment is from So Sorry. I used Crumb Cake ink and used the Stamp-a-ma-jig to get it placed where I wanted it. For the flowers, I used the set Field Flowers. I stamped the stem in Pear Pizzazz and again, used the Stamp-a-ma-jig to get the flowers where I wanted them. Actually, I should have stamped the flowers a little lower, but it's okay. I stamped them in Perfect Plum,stamping off the flower underneath in the Two-Step process. Since I didn't get the flower in the frame quite where I wanted it, I stamped off a leaf in the corner to fill some of the space. I thought about adding another under sorry, but I usually get myself into trouble when I keep adding, so I thought I'd quit while I was ahead.

I'm going to try to get one more card knocked out for tomorrow and then I'll post all of this month's 'Kits/Cards To Go'. Make sure to swing by tomorrow. Thanks so much for stopping by!

Friday, June 28, 2013

BRING ON THE CAKE CARD:

Hello there! Today I have a masculine card to share. These are kind of rare for me. I don't know why but I struggle with them-I keep wanting to add stuff, but they're usually better simple and to the point. I started with an Early Espresso base and added a piece of the Natural Composition Specialty DSP-gorgeous stuff! On top of that I added a piece of Soho Subway DSP and rounded the corners with the 3/16" Corner Punch. On top of that I added a piece of Espresso Core'dinations Cardstock, flagged the end and roughed it up a bit using the Sanding Block and Dust Buddy. I wrapped a piece of Island Indigo Baker's Twine around it and tied it in a knot. I stamped the image from Bring On The Cake in Early Espresso onto Very Vanilla Cardstock. I stamped it again in Summer Starfruit, cut out the sign and adhered it in place with SNAIL. I popped up the Vanilla and Espresso layers with Dimensionals. I added a Naturals Button with a Glue Dot and stamped the sentiment using an Early Espresso Marker. I usually try to get a close up picture for you, but the camera decided to not let me take any more pictures. At least I got this one. Sorry to keep this so short, but I'm one tired pup and am heading to bed. Thanks so much for stopping by!

Thursday, June 27, 2013

CREATE A CUPCAKE CARD & BAG:

Hello there! So sorry I skipped out on yesterday! We went out of town with the 2 grandbuddies and by the time we got home I had nothing left! I'm super excited to say that I found a bunch of things that didn't look hideous on me to take to SLC for Convention in a few weeks!!! Clothes shopping is usually pretty horrible, but everything I grabbed seemed to work. Maybe I've just finally resolved myself to the mindset 'it is what it is'!  My mom has a birthday this week-end, so I wanted to share a couple of projects I've been working on for her.
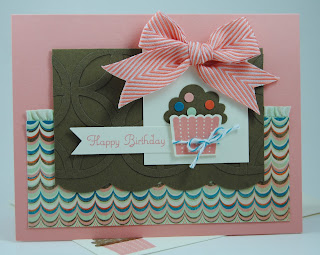
I'll start with the card first. I used a Crisp Cantaloupe base and layered a piece of Venetian Romance DSP on top with a Pistachio Pudding Ruffle Trim attached. Next, I added a piece of Soft Suede Cardstock that I ran through the Big Shot using the Large Scallop Edgelit. I added a little interest with the Lattice Die and glued it to the Soft Suede piece. I've had the untouched Lattice Die and Scallop Edgelit for awhile and they were both just begging to be used for this card.

I stamped the cupcake base in Crisp Cantaloupe ink and punched it out with the Cupcake Builder Punch. The frosting was punched out with Soft Suede Cardstock, and the sprinkles are Crisp Cantaloupe, Island Indigo, Pistachio Pudding and Tangerine Tango Cardstock. I popped the base up with a Dimensional and added an Island Indigo Baker's Twine bow. The ribbon that I thought was Tangerine Tango, is actually Calypso Coral Chevron Ribbon, but it seems to work anyway.

 Finally, I stamped the sentiment in Crisp Cantaloupe ink and cut it out with the Bitty Banners Framelits. Now onto the purse...

My good friend, Jamie Hurley, had a cute little bag on her blog at http://jhurley90.blogspot.com and she pointed me to this video with instructions to make it: http://www.frenchiestamps.com/2010/1...-cute-6x6.html. After I started watching it I remembered that I had seen it AND I had made one of the bags,... and there it was sitting on my shelf! Sad and scary-this brain of mine! Anyway, I used another pattern from the Venetian Romance DSP, cut and scored it as shown in the video and used Soft Suede Cardstock for the trim and handles.

I used the Essentials and Occasions Paper-piercing Packs, Mat and Tool for the faux stitching and used a Soft Suede Marker to connect the dots. I added the fun Candy Dots in the Neutrals Collection to the Candy Dot Bases and attached the handles. Next, I punched out the flap using the Extra-Large Oval Punch, scored it down the center and attached it to the back of the purse using Sticky Strip. I punched out a circle using the 3/4" Circle Punch and attached it to the oval using an Antique Brad. I finished it off by attaching a Velcro dot underneath the flap.

This purse holds a gift card perfectly, so I stuck a Chico's one inside and my mom's all set!

It doesn't show up too well in the photos, but the card and bag are a perfect match. I hope I redeemed myself from yesterday with a double-post today! Check out the video and make yourself one of these cute little bags! Thanks so much for stopping by today!

Tuesday, June 25, 2013

FOUR FRAMES CARD:

Hello there! Popping in with a quickie today! I've been making a good dent in the wedding invitation production. I cut and scored 200 invitations along with belly bands, stamped and punched out 200 labels and am making my way through 400 decorative strips with the Big Shot. My neck is killing me and my hand quit working, lol! So, I thought I'd take a break and share a super easy card with you. I stole the layout from our Stampin' Success a few issues back. I changed the colors up too, as I was wanting to break out the new Modern Medley DSP. I used the set Four Frames, an oldie but a goodie, and the new hostess set Express Yourself.


I stamped the image in Basic Black and used the Decorative Label Punch. I added a couple of Dimensionals and attached it to a piece of Basic Black Core'dinations Cardstock. I wrapped a piece of Basic Black Taffeta Ribbon around it and used the Essentials Paper-piercing Pack, Mat and Tool to add some detail. I finished it off with a couple of Very Vanilla flowers punched out with the Itty Bitty Shapes Punch Pack and Basic Pearls.

If you need a fast and easy card, this one will work! Well, time to get back to the Big Shot. Thanks so much for stopping by!

Monday, June 24, 2013

LABEL LOVE CARD:

Hello there! I have another card for you today showcasing lots of new products. I used the set Lable Love and the sentiment is from the Hostess set Express Yourself. I recently did some ribbon and paper shares and I had a couple of spots to fill ,so I took them. I got all 50 colors of the Core'dinations Cardstock, all 12 colors in the Chevron Ribbon and every piece of DSP-so cool to have all of them at my fingertips! I thought I'd put them all to work on this card. I started with a Crushed Curry base that I sanded with the Dust Buddy to reveal some of it's awesome texture. I added a little more detail around the edges using the Essentials Paper-piercing Pack, Mat and Tool. I used the Afternoon Picnic DSP which gave me a lovely palette of Wisteria Wonder, Crushed Curry and the brand new Coastal Cabana. I added a Very Vanilla border around the DSP and used the Big Shot along with the Adorning Accents Edgelits and Folder for the dainty scalloped border.

I stamped the label in Crushed Curry and punched it out with the Artisan Label Punch. I added one of the scrumptious Boutique Details to the center and tied a piece of Linen Thread around it. I tucked a piece of Crushed Curry Chevron Ribbon underneath along with the sentiment that I cut out with the Bitty Banners Framelits. You knew I couldn't stay away from those flagged ends for long!

I also used the new Magnetic Platform for the Big Shot which keeps the Framelits just where you want them-no more sticky notes! It's worth every penny! Well I'm off to get started on another card or two so tomorrow I can get back to my wedding invitations. Wish me luck! Thanks so much for stopping by today!:)

Sunday, June 23, 2013

ZOO BABIES CARDS:

Hello there! I have a pair of cards for you today-one for a boy and one for a girl. I used the set Zoo Babies, which is maybe my most fave set in the catalog-it's way up there anyway. And the best part is I got it for free! I earned it during SAB:) I started with a Soft Suede base and layered it with Pear Pizzazz and Tangerine Tango on top of that. I used the Big Shot and the Finishing Touches Edgelits for the decorative edge.

I stamped the giraffe in Pear Pizzaz, wiped off the ink on the tail and mane and colored it with a Soft Suede Marker. I stamped the image onto Whisper White Cardstock. I used the Owl Builder Punch to pop out a few polka dots in Tangerine Tango and glued them in place. I used I Am Me DSP and I am lovin' it! I stamped the sentiment in Soft Suede ink onto Pool Party Cardstock and flagged the end. I wrapped some Early Espresso Baker's Twine around it several times and tied a bow.

I popped the Tangerine Tango piece up with Dimensionals. Finally, I added a pair of Subtles Buttons to finish it off. You may have seen this color scheme in the catalog on page 57 and they suggested an alternate combo for a girl, so that's what I went with...


I duplicated everything from the above card except I used the following colors: Basic Grey, Blushing Bride, Strawberry Slush and Pumpkin Pie. I used the Quatrefancy Specialty DSP and traded out the polka dots for a Strawberry Slush Ruffle Trim skirt. Say that 3 times fast!


 Finally, I added some Calypso Coral Baker's Twine and Brights Buttons. I should have stamped the giraffe a little higher, but you get the idea.


I hope you like my his & hers cards-pretty quick and easy. As always, thanks so much for stopping by! :)

Saturday, June 22, 2013

KIND & COZY CARD:

Hello there! Today I have a card for you made with some of my favorite things from the new catalog. I used the Kind & Cozy set along with the Gingham Garden DSP and coordinating Washi Tape. It's all so bright and cheery and just puts me in a happy mood:) I started with a Daffodil Delight base and layered a piece of Whisper White Cardstock on top. There was so much white, so I added a subtle border using the Essentials Paper-piercing Pack and Mat and a Pear Pizzazz Marker. I used the same tools and added a border around the DSP using the paper-piercer instead of the marker.

I put down 2 strips of Washi Tape and added the floral circle that was punched out with the 2 1/2" Circle Punch. I stamped the focal image in Melon Mambo and punched it out with the same circle punch. The Pear circle was punched out with the 1 1/4" Circle Punch. I stamped the cup again in Night of Navy, cut it out and popped it up with Dimensionals. The heart was punched out with the Small Heart Punch and attached with a Glue Dot. I had to really fight the urge to flag the end on the sentiment, but I think it works.

 I finished off the card with a trio of coordinating Candy Dots in Brights, Regals and Subtles. I just got them yesterday and couldn't wait to try them out. So easy! And anything that has to do with candy is alright in my book! I hope this card makes you all warm and fuzzy inside, well maybe just fuzzy...you're probably already plenty warm. Thanks so much for stopping by!


Friday, June 21, 2013

EPIC DAY HOSTESS GIFT:

Hello there! Is it hot enough for you today? I think I'm melting. Quinten and me walked all over town today in 90 something degrees. We did luck out and find a sprinkler which was heavenly! This is the gift I made for my hostess this month. I'm slowly converting my wood sets to the new stamp cases and was trying to come up with something to do with the old cases. I thought it made a cute little suitcase!

I covered the outside with This & That Epic Day DSP and used the Natural Trim for a handle. I folded the trim under on each side and stuck an Antique Brad through on both sides. I added Sticky Strip to the bottom of the brads and attached the handle to the top of the case-well, actually the side.

I used the Essentials Paper-piercing Pack, Mat and Tool for the faux stitching around the edge, and used an Early Espresso Marker to connect the dots. I then decorated the front with some of the fun Epic Day Stickers.


For the inside, I just added a belly band that I scored in a couple of places, added some of the Crisp Cantalouple Stretch Ruffle Trim, and Sticky Stripped it in place.

Of course, I filled it with chocolate, which hopefully isn't melting all over the place like me. I hope you like today's project and gives you some ideas for ways to use any cases you may have laying around. Thanks so much for stopping by!

Thursday, June 20, 2013

REALLY GOOD GREETINGS CARD:

Hello there! As you've figured out, I didn't make it back yesterday. Our son and his new girlfriend-love her!, came over for supper and it turned into a late night. So to make it up to you, I've got 2 posts for you today! The first is a card made with Really Good Greetings. I started with a Summer Starfruit base and used the Birthday Basics DSP again. I absolutely adore this pattern. It jumped out at me the first time I went through the new catalog-love it!


I broke out the Crisp Cantaloupe for the first time, and I like it. I don't have the new In-Color Markers yet, so I inked up the whole stamp in Crisp Cantaloupe and wiped off some of the ink with a baby wipe. I then colored in the sentiment with Raspberry Ripple, Gumball Green and Summer Starfruit Markers. These colors work beautifully together. I stamped the sentiment on Very Vanilla and layered it onto Crisp Cantaloupe Cardstock. I punched out the flower with the 1 1/4" Scallop Circle Punch and used my Paper Snips to notch petals all around. I added one of the new lovely Very Vintage Buttons with a Calypso Coral Baker's Twine bow. I popped the flower and the sentiment up with Dimensionals.

Before I adhered the DSP to the Summer Starfruit Cardstock, I added a piece of Raspberry Ripple Stitched Ribbon and attached the bow with a Glue Dot. I also added a strip of the new Crisp Cantaloupe Ruffle Trim-love this stuff! I tucked some banners underneath that were made with the Big Shot and Bitty Banners Framelits.

And, as I promised, onto the next project...

I got my monthly gift, and it came a day early-gotta love it! Of course I'm talking about My Paper Pumpkin! Many have said this is their favorite so far. I was in the minority and not crazy about it at first.  But after I started working with it and put my spin on it, I really do like it too.

It's kinda hard to see, but the card front has 5 hexagons that you punch out and stamp a heart on the inside, which peeks through the holes. I added some Dimensionals to the chevron images to give it a little extra depth. I also added a Pumpkin Pie Taffeta bow and one of the new Brights Buttons with Early Espresso Baker's Twine through the center.

This is how the card is designed in the kit. I thought it was a little too heavy at the bottom, so I feft some of the hexagons off. That's what is so great about these kits-you can add some embellishements if you want or just go with the design provided. And the best part is that you can whip up 4 of these in under a half hour! Everything is prepped for you and ready to go! If you're interested in finding out more, go to www.mypaperpumpkin.com and check out the video.

Well thanks so much for visiting. I'm getting started on another project for you. I've got Hurricane Q tomorrow, so hopefully I get it finished! Thanks so much for stopping by!