Tuesday, March 22, 2016

PARTY PANTS CARD:

Hello there! I'm waiting on primer, so I thought I'd share a quickie today. I got the idea for this on the SU! site featuring the SAB set Party Pants. I started with a Whisper White base and added strips of the SAB Glitter Tape. I added the top strip, measured and marked the width of the tape below it and lined the tape up with the pencil marks~easy peasy!

I ran a piece of Night of Navy Cardstock through the Big Shot using the Circles Framelits and stamped the background with the same ink. I added a piece of Cherry On Top DSP on top~a little redundant? I then added a strip of Gold Sequin Trim with Glue Dots. I stamped the sentiment with Night of Navy ink onto Whisper White Cardstock and added a swirl to the back using Gold Metallic Thread.

I attached the sentiment piece with Dimensional pieces. Finally, I scatterd around a few sequins from the Gold Sequin Trim and adhered them with the Fine-Tip Glue Pen.

This was a super quick & easy card to put together and you could easily customize it with school colors for any upcoming grads you may have. I may have time to come up with another SAB idea for you~just depends on when my Paper Pumpkin gets here. Once it does I'll be shifting gears:) Thanks so much for stopping by!

Monday, March 21, 2016

PEDAL PUSHER CARD:

Hello there! Back today with another card featuring a Sale-A-Bration set called Pedal Pusher. I thought this would be the perfect card to welcome Spring, but maybe I need something with a snowblower on it:( Oh well, sun is shining~it's all good! I started with a Blushing Bride base and added a piece of Birthday Bouquet DSP to the bottom. I used the Itty Bitty Accents Punch Pack to add the flowers to the background.

I stamped the image with Soft Suede ink onto Whisper White Cardstock and used the Deco Labels Framelits, along with the Big Shot to cut it out. I colored the bike using Blender Pens and Pool Party, Soft Suede, Mint Macaron & Blushing Bride pads. I added a banner for the sentiment using Soft Suede Cardstock & ink.

I added a Tea Lace Doily underneath the label and attached a Bow Paper Clip Embellishment. I folded a piece of Pool Party Glitter Ribbon and tucked it into the paper clip. The ribbon was so gorgeous, I decided to run a strip of it over the DSP. I attached Dimensionlas to the back of the label and adhered it to the card.

I meant to get this posted a couple of days ago, but I got a painting gig and this old body has taken a beating! Thanks so much for stopping by:)


Friday, March 18, 2016

BOTANICALS FOR YOU CARD:

Hello there! Just popping in today with a card featuring another Sale-A-Bration set, Botanicals For You. There's only 2 weeks of SAB left, so I want to focus on some SAB products that you can earn for FREE with a $50 purchase. I started with a Calypso Coral base and stamped the background flowers with Calypso Coral ink as well. I added a layer of Wildflower Fields DSP~another SAB option, and topped that with a piece of Botanical Gardens Vellum, which is also a SAB pick.

On top of that I added a piece of Whisper White Cardstock stamped with Lost Lagoon ink. I attached it to the vellum with In Color Washi Tape. I used Calypso Coral Cardstock and ink for the sentiment and adhered with SNAIL. I stamped the flowers with Crushed Curry ink onto Whisper White Cardstock and cut them out with my Paper Snips.

I stamped the leaf image with Old Olive ink onto Old Olive Cardstock and used the Bird Builder Punch to pop out the leaves. I attached the leaves with SNAIL and the flowers with Glue Dots. I then added some Basic Rhinestones.

I finished it off with some Crushed Curry Baker's Twine that I wrapped around the card and tied in a bow. Make sure to check back for some more ideas of how to use your SAB sets and maybe inspire you to get a few more before they're gone for good. Thanks so much for stopping by!


Wednesday, March 9, 2016

THAT THING YOU DID CARD:

Hello there! Today is our son Joel's birthday and this is the card I made for him using the set That Thing You Did. He's an old soul and loves anything & everything vintage, so it was a perfect fit:) I wanted to go with a 70's fashion style, so I knew I needed a rainbow in the mix. I started with an Early Espresso base and added strips of Real Red, Pumpkin Pie, Daffodil Delight, Cucumber Crush & Pacific Point Cardstock.. I then stamped the dotted border with Early Espresso as well.

I ran a piece of Whisper White Cardstock through the Big Shot using the Stars Framelits. I stamped the sentiment with Daffodil Delight ink and then used Pumpkin Pie ink on the edges. I stamped the starburst image again using Early Espresso ink and cut it out with Paper Snips. I then used the Eclectic Paper-piercing Pack, Mat & Tool to add some interest. I added a piece of scrap Whisper White Cardstock to a piece of Glitter Metallics Tape and punched out the star using the Itty Bitty Accents Punch Pack. I removed the cardstock from the tape and adhered it to the starburst. I then attached to the star with a Dimensional.

Next I punched the clouds out of Soft Sky Cardstock using the Cupcake Builder Punch. I added some sequins from the Metallics Sequin Assortment and attached them with Glue Dots.

Joel is visiting some friends in Colorado and texted me that he loved his card from the airplane. You can bet your bippy they'll be celebrating big today! Thanks so much for stopping by:)

Monday, March 7, 2016

HONEYCOMB HAPPINESS DESSERT:

Hello there! Today I have a fun project to share that I made for the God's Portion Day Auction that was held yesterday to raise money for a local school. My sister makes a mean Ice Cream Dessert and she asked me to come up with something to hold the recipe and decorate the pan. I decided the Honeycomb Happiness set was perfect and paired it with the Birthday Bouquet DSP.

I made a belly band to go around the pan and tied a piece of Watermelon Wonder Stitched Satin Ribbon around it. I then used the Envelope Punch Board to make an envelope to house the recipe card. I ran a piece of Blushing Bride Cardstock through the Big Shot using the Project Life Cards & Labels Framelits, and stamped the background image with Blushing Bride ink as well. Next I stamped the banner from Amazing Birthday in Mint Macaron and cut it out with the Banner's Framelits. I then cut out a label using the  Deco Labels Framelits.

I attached the label to the banner with Dimensionals and attached it to the Blushing Bride label with Dimensionals as well. I added a Tea Lace Doily and then adhered it to the envelope with SNAIL. I printed the recipe name onto a piece of Mint Macaron Cardstock and cut it out with the PL Cards & Labels Framelits. Next I stamped the cone image with Early Espresso ink onto Soft Suede Cardstock. I stamped the ice cream image with Blushing Bride ink onto Blushing Bride Cardstock and cut them out with my Paper Snips. I attached a Honeycomb Embellishment on top and attached the ice cream cone to the label with Dimensionals. I then added a few sequins from the Metallics Sequin Assortment with Glue Dots.

I attached the envelope to the ribbon using a Mini Metallic Clothespin. Amy was able to slide the belly band off and fill the pan with her yummy dessert, and put the band back on after it was set. This was a fun project and I love how the Honeycomb Happiness and Birthday Bouquet DSP work so well together. Thanks so much for stopping by:)

Sunday, March 6, 2016

CHICK TREAT HOLDER:

Hello there! Here's the last of my Creative Crew projects for this month. We were to make a scrapbook page or a 3-D gift for one of the guys in our life~young or old. I figured I'd get a jump start on Easter for my grandsons:) I ran a piece of Daffodil Delight Cardstock through the Big Shot using the Curvy Keepsake Box Thinlit and stamped the sweet little chick from Honeycomb Happiness in Crumb Cake ink. I colored his cheeks with a Q-Tip and Pink Pirouette ink.

I assembled the box and added one of the Honeycomb Embellishments which I colored to match the chick. I filled a Stampin' Spritzer about 3/4 full with rubbing alcohol and added 20 drops of Daffodil Delight reinker and shook. I ran a couple of rows of SNAIL on my Grid Paper, opened the honeycomb and adhered it to the SNAIL. I then sprayed it a couple of times with the Spritzer, being carfeul to not over-saturate it. I let it dry while I made the tags.

For the Easter egg I ran a piece of Whisper White Cardstock through the Big Shot using the oval tag die. I added 3 rows of It's My Party Washi Tape and trimmed off the excess using my Paper Snips. I then added the smaller dots from It's My Party Enamel Dots. Next I stamped the sentiment from Teeny Tiny Wishes with Crumb Cake ink onto Whisper White and used the Label Punch to punch it out. I used the 1/8" Circle Handheld Punch to run a piece of Crushed Curry Baker's Twine through both tags and tied a bow.

I finished it off by stamping the bow with Crumb Cake ink onto Pool Party Cardstock and cut it out with my Paper Snips...and I just realized why the bow didn't match the washi tape...it's Mint Macaron, not Pool Party:( So the next one will have a Mint Macaron bow:) I attached it with a Glue Dot. Finally I stamped his feet with Crumb Cake ink onto the same cardstock, cut them out and glued them onto the bottom of the box with Liquid Tombow. To see the fun projects everyone else came up with click on the Creative Crew button to the right. Make sure to stop back tomorrow for another fun project that I made for an auction. Thanks so much for stopping by:)


Saturday, March 5, 2016

PARTY PANTS CARD:

Hello there! Back today with another Creative Crew project. For this challenge we were to make a birthday card focusing on embossing folders to add some pizzazz. You don't get much more pizzazz than with the Confetti Embossing Folder! I started with a Sahara Sand base and added strips of the SAB Metallics Glitter Tape along the edges. I then ran a piece of Basic Black Cardstock through the Big Shot using the Confetti Embossing Folder, and adhered to the base with Dimensionals.

I ran a piece of DSP from the It's My Party DSP Stack through the Big Shot using the Ovals Framelits and adhered to the center of the Basic Black. Next I stamped the balloons from Party Pants in Crushed Curry and Mint Macaron ink onto Whisper White Cardstock. I cut them out with my Paper Snips but you could get the Balloon Bouquet Punch and let it do all the work for you:)

I tied strings onto the balloons using Basic Black Baker's Twine and attached them with Dimensionals. I stamped the sentiment with Basic Black Archival ink onto a coordinating piece of It's My Party DSP, added a couple of staples with the Handheld Stapler & Mini Staples, and adhered it with Dimensionals. I finished it off by sprinkling a few sequins around using the Metallics Sequin Assortment and attaching them with the Fine-Tip Glue Pen.

I debated on whether I really needed another balloon birthday stamp set, but since it was free I decided that Yes, I did:) You can get it for FREE too...or choose the Metallics Glitter Tape or Pedal Pusher stamp set with any $50 purchase. See them here:   http://su-media.s3.amazonaws.com/media/catalogs/Sale-A-Bration%202016/20151005_SAB16_Core_eng-US.pdf. Or go to www.lauramellinger.stampinup.net. Remember Sale-A-Bration only runs through the end of March, so get them while you can:) Thanks so much for stopping by!

Friday, March 4, 2016

BOYS WILL BE BOYS CARD:

Hello there! Today I have a fun card that served double-duty this month. Our oldest grandson Gabriel turned 10 at the end of February, so I wanted to make something extra special for him now that he's double digits! I also made this work for the Creative Crew Challenge this month focusing on paper-piercing. I started with a Tangerine Tango base and added a piece of Schoolhouse DSP. I added 2 other coordinating patterns from the DSP as well.

I punched out a circle from Daffodil Delight Cardstock using the 2 1/2" Circle Punch and used the Essentials Paper-piercing Pack, Mat & Tool to add the textural element. I added a couple of strips of Cherry On Top Washi Tape and stapled the DSP to the circle using the Handheld Stapler & Mini Staples. I stamped the Lego image from Boys Will Be Boys onto the circle using Basic Grey Archival ink.  I trimmed the circle and adhered with Dimensionals.

I then stamped the Lego image onto Pool Party, Pacific Point & Tangerine Tango Cardstock. I cut out the blocks with my Paper Snips and adhered the Pacific & Tangerine blocks with a Dimensional. I stamped the sentiment onto Tangerine Tango and cut the words apart.

I then used the Project Life Corner Rounder Punch to round the edges on the right.

As I mentioned earlier, turning 10 is a big deal so I wanted to make his card extra special, so I made the inside pop up. I cut rectangles in Daffodil Delight, Tangerine Tango, Pool Party, Pacific Point & Garden Green Cardstock and used the Cupcake Builder Punch to pop out ALOT of circles for the Legos. I adhered them to the blocks using Liquid Tombow. Next I cut strips of Pool Party to assemble a base to attach the blocks to.

I cut another piece of Schoolhouse DSP to 8" x 5" and folded it in half. While keeping it folded, I measured & marked down 1" from the top. I then turned the folded paper so that the fold was at the top and used my Stampin' Trimmer to cut a slit down to the 2 1/8" mark. I repeated the process for the bottom. While still folded, I used the scoring blade to score a line from the 2 slits. I adhered the DSP to the inside and added the blocks to the pop-up piece with Liquid Tombow. I then stamped the blocks and the sentiment using the set Words of Truth.

Here's a few pics of the birthday boy:)

We had his birthday at SkyZone in Cedar Rapids which has wall to wall trampolines.

We had 1 whole court to ourselves for an hour...which was entirely too long for an old lady like me:) But I am happy to report that my daughters wet their pants before I did:)

I don't know where the time went~10 years went by fast!

This just seemed like yesterday:( Thanks so much for stopping by!

Thursday, March 3, 2016

GOING GLOBAL CARD:

Hello there! Just popping in to share one of my cards for the Creative Crew challenge this month. We were to focus on the Going Global DSP Stack found in the Occasions Catalog. Since it was on backorder and I didn't get it in time for the deadline, I just focused on the colors in the DSP. I started with a Very Vanilla base and added a layer of Typeset DSP.

I ran another design of DSP through the Big Shot using the World Traveler Embossing Folder. I used the set Going Global and stamped the compass image with Sahara Sand ink. I like the textured effect of stamping over the embossed paper. I colored the stars on the Big Dipper image with a Basic Black Marker and stamped them in the background.

I stamped the compass image onto Sahara Sand Cardstock with Sahara Sand ink and punched it out with the 2" Circle Punch. I punched a hole in the center with the 1/8" Circle Handheld Punch and added an Antique Brad. I stamped the sentiment with Basic Black Archival ink onto Lost Lagoon Cardstock and cut it out with the Large Numbers Framelits. I added a piece of Bohemian Washi Tape and stapled a piece of Lost Lagoon Striped Ribbon with the Handheld Stapler & Mini Staples.

I added a swirl of Gold Metallic Thread and attached the compass & banner with Dimensionals. All of the projects this month were to be geared towards the guys in our life, so that was a challenge. And not having the DSP to work with didn't help either. So I guess what I'm trying to say is I'm not really thrilled with how this card turned out, so I thought I'd get it out of the way first. Check back tomorrow for a much funner card. Thanks so much for stopping by:)

Tuesday, March 1, 2016

HELLO SUNSHINE FEBRUARY PAPER PUMPKIN:

Hello there! I've finally gotten to February's Paper Pumpkin~Hello Sunshine and wanted to share my projects with you.:)

This is the awesome stamp set that came with this month's kit. I love this fun font and will be using these a lot. The kit came with a Blackberry Bliss spot.

These are the 3 designs included made according to the instructions. Check out the adorable envelopes~so cute!

This is one of the alternate ideas that was found on the SU! site. Such a fun idea using the Kraft Tag A Bag Gift Bags.

I cut apart one of the envelopes~which was painful! and made a little sheet of stationery to write a note on. I used a Clothespin to attach it to the Kraft Gift Bag envelope. I finished it off with a Whisper White Baker's Twine bow.

This is another card made by a SU! artist, and I love the simplicity of it. And if the envelopes weren't cute enough~check out the inside as well.

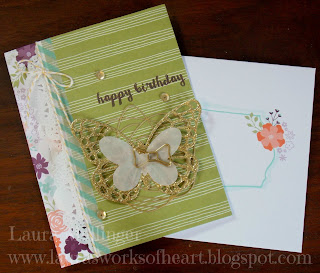
And here's 1 more that I found on the SU! site. Go to www.stampinup.com to see the originals. I'm so glad they share their alternate ideas with us:) I inked up each flower in a different color using Calypso Coral, Pool Party & Bermuda Bay, So Saffron & Blushing Bride. The sentiment was stamped with Bermuda Bay and I added a swirl of Gold Metallic Thread underneath.

Here's a shot of the envelope~isn't it just the cutest? I simply folded the card so the printed design would go on the inside and added the flowers to the corner.

For this card I added some In Color Washi Tape and a Blushing Bride flower that I cut out with Paper Snips. I stamped the flower centers with So Saffron ink and used the Owl Builder Punch to pop them out.


On this one I desecrated another envelope:( and attached the label to the base with Dimensionals. I added a piece of Blackberry Bliss Cardstock and rounded the edges using the Project Life Corner Rounder Punch. I added a Pool Party flower which I cut out by hand.

I found the layout for this card on Pinterest. I started with one of the printed card bases provided and added a layer of Wildflower Fields DSP, which I adhered a border of Tea Lace Paper Doilies to. I added a piece of It's My Party Washi Tape over the top and tied a piece of Crushed Curry Baker's Twine around the base. I cut a piece of scrap cardstock and covered it with the brand new SAB Metallics Glitter Tape. I then placed one of the butterflies from the Butterflies Thinlits on top and ran it through the Big Shot. The tape is kinda thick so I ran it through once, put it in reverse and ran it through a 3rd time to make sure it cut all the way through. I cut out another butterfly from Vellum Cardstock, which I stamped with a floral design and the Clear Wink of Stella Glitter Brush. Finally, I added a Bow Paper Clip Embellishment.

For my last card I used the Kinda Eclectic stamp set and used So Saffron ink for the starburst. I stamped the giraffe from Zoo Babies in Pool Party and cut it out with my Paper Snips. I added a Crushed Curry Baker's Twine bow and Sweet Li'l Things Washi Tape. I finished it off with a retired Home For Christmas Button.

My little buddy Q came over today and hung out with us because his mommy and sissy have the flu:( I told him I had to work on cards and he wanted to 'help' as always. Gabe is having his tonsils & adnoids removed tomorrow, so we decided he'd make a Get Well card for him. Then he decided he wanted to make one for mommy and sissy too and daddy and for himself too. He picked yellow for Gabe, purple for mommy, orange for sissy, red for him and black for daddy... because he's black, lol. Anyway, after I cut the cardstock and got his little desk set up, he said he was done:) Maybe we'll make more progress tomorrow:)

This was one of my favorite kits and now I'm ready for Spring to get here! If you're interested in possibly getting this kit, sign up for Paper Pumpkin by March 10th, and you'll be able to order the kit/refill when it becomes available again for Paper Pumpkin subscribers...and you'll be able to attend my Paper Pumpkin Party on the last Thursday of the month:) Thanks so much for stopping by!