Wednesday, November 30, 2011

ARTISAN HOLIDAY SHOWCASE:

Hi everyone! I changed things up on you. I'll post some cards from Card Night in the next few days, but I wanted to share a card I made for the Holiday Showcase on Facebook. You can see the other Artisan projects if you go to www.stampinup.com. Click on the Facebook link. Or you can find it at the bottom of the Demonstrator Home Page. I have all the supplies listed there. Sorry this is going to be short & sweet today, but I have my Downline Christmas Party to get ready for. I'll have lots to share in a couple of days. See you soon!

Monday, November 28, 2011

WORKSHOP FAVOR:

Here's a quick and easy favor I made for a workshop I held a couple of weeks ago. It uses the Two Tags Die in Wild Wasabi and a little bit of Just Add Cake DSP. I punched out a cirle in the middle and put a border of Red Glimmer Paper around it along with a Whisper White scallop circle. I stamped 'merry' from Pennant Parade and punched it out with the mini oval punch-it has some weird measurement that I never remember. I added a little bit of the Dotted Scallop Ribbon in Cherry Cobbler.  Thanks so much for coming by. Stop back tomorrow and I'll show you one of the cards we made at Card Night this month. Have a wonderful day!

Saturday, November 26, 2011

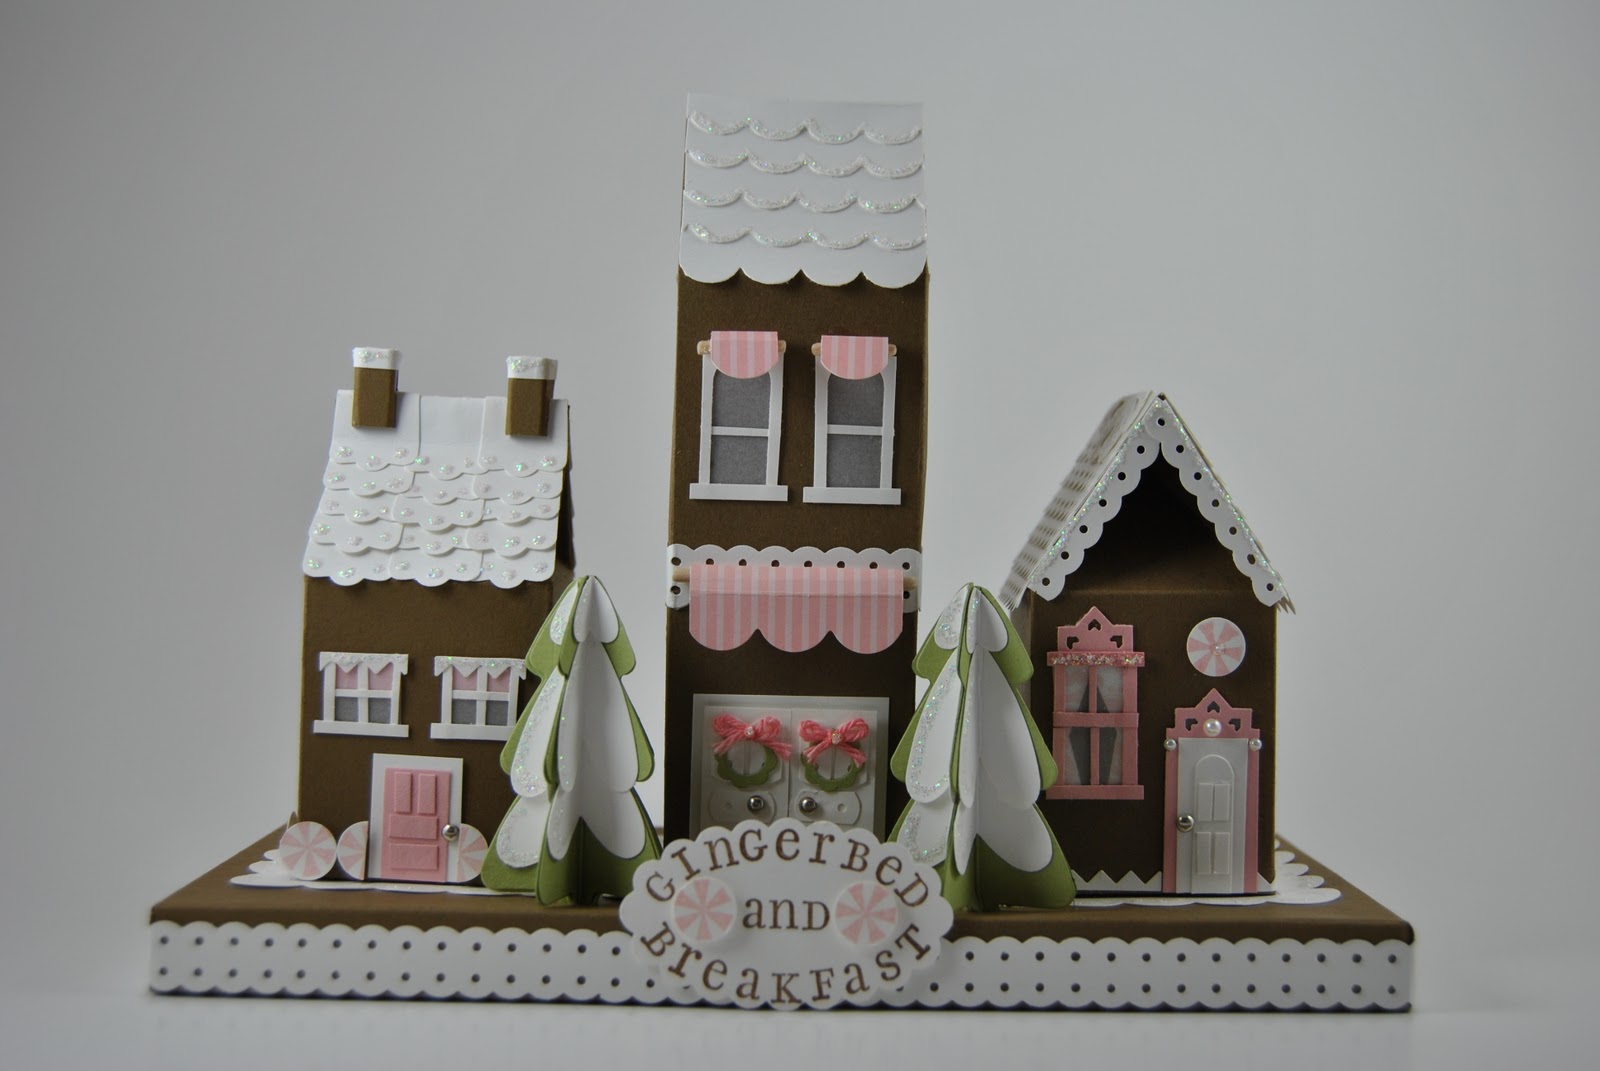
GINGERBED & BREAKFAST:

I wanted to share something fun with you today. This is a project that I entered for a SU! contest a couple of months ago...and it was a winner! I hold a demo meeting every month and I always give my downline a challenge every month. We were to all come up with a project that we would send in for the contest. I felt kind of guilty winning it, but once I started making these cute little houses, I kind of got carried away! But I hope that it's inspiring to them to keep creating and entering. If little ol' me from little Burlingon, Iowa can win-anyone can!

I saw the idea for a tiny gingerbread house at Convention, using the Mini Milk Carton Die. I'm not a big fan of red & green, so I used a Soft Suede & Pink Pirouette color scheme. I popped out 4 milk cartons with the die and stacked the one in the middle. I used the tree image from the Stocking Accents Die that coordinates with the Stocking Die for the trees, and added snow using the Heart to Heart Punch. I addes some Dazzling Details to give it some sparkle.

I hope you enjoyed my little work of heart and maybe you and your little ones can make some of your own. Thanks for coming by!

Friday, November 25, 2011

FOUND HIM!

I hope you all had a wonderful Thanksgiving yesterday! Here is the snowman card I was looking for earlier. We made this at a workshop a couple of weeks ago which coordinated with the snowman Hershey Bar. I used a Very Vanilla base using the Perfect Polka Dots Folder to emboss it. I used the Peekaboo Die to cut out the frame in Chocolate Chip. The snowflake was made with the Northern Frost Decorative Strip.

I used the Holly Berry Bouquet DSP and a strip of Wild Wasabi using the Scallop Border Punch. The ribbon is the Scallop Dots in Chocolate Chip and I added a Basic Rhinestone to the snowflake. I used the Button Buddies for the cute little snowman and added a button using the Sweet Buttons Die. The inside sentiment is from the Holiday Happiness set. The little flower is punched out with the Itty Bitty Shapes Punch Pack.

Sorry for the break from posting. It's been a little nuts around here and it doesn't look like it's going to let up anytime soon. I'll try to post every day, but it may be short & sweet for awhile! Thanks for stopping by and I'll share a 3-D project with you tomorrow. Now off to the Y to work off yesterday! Talk to you soon!

Friday, November 18, 2011

MERRY FAVOR:

Sorry, I couldn't find the card I was going to share with you, so here's a little favor that we made at my Hostess Appreciation Night. I used the Pillow Box Die in Real Red. I punched the window out with the Decorative Label Punch on the side without the tab. I cut a Window Sheet to fit over the opening and adhered it to the inside using Sticky Strip. I put Sticky Strip on the tab and on the bottom tab and made my box. It holds 2 Christmas Nougats perfectly. Have you tried the Cinnamon ones? They are scrumptious! But I couldn't stop til after I ate about a dozen of them, and they aren't the thing to eat if you have an ulcer! I'll have to steer clear of them for awhile! After you put your treat inside, put some Sticky Strip on the top flap and seal it. I used the Pennant Parade set and stamped the trees on Wild Wasabi...I think, and punched them out with the Petite Pennant Punch. I punched out 4 trees and scored them down the middle with the stamped image facing inside. Fold them in half and stack them on top of each other using SNAIL. Fan them out and attach them to the box using Sticky Strip. I ran a Mini Jingle Bell through some Espresso Baker's Twine and tied a bow and attached it to the top of the tree using a Mini Glue Dot, or booger, as they're known in the stamping community. I added a red Holly Berry Button with some twine through the center and stuck it on with Sticky Strip. Finally, I added a little Merry tag and punched it out with the Jewelry Tag Punch. I'll try to find that snowman and post him tomorrow. Thanks for stopping by. Have a good night!

Wednesday, November 16, 2011

HERSHEYS SNOWMAN:

This is one of the Make & Takes we did at my last workshop. I had seen the idea at Convention or the Minnesota Regional-can't remember which-but I remembered that I wanted to make him for Christmas. I started with a sheet of 6" x 5 1/4" Very Vanilla Cardstock, scored at 1 3/4", 2", 4" and 4 1/4" on the shorter side. I folded it around a Hershey Bar and adhered it with Sticky Strip on the back.
Next, I cut a piece of the Holly Berry Bouquet Fabric at 6" x 3". I folded the fabric at 1/4" on the short side and ironed it to have a finished edge. I cut a piece of the Wild Wasabi Striped Grosgain at 6" and folded it on half and ironed it. I put a piece of Sticky Strip on the inside of the ribbon and attached the fabric to the ribbon. I used Sticky Strip to attach the fabric/ribbon hat to the top of the Very Vanilla and wrapped it around. I added another piece of Sticky Strip to the finished edge of the fabric in the back and that made my hat. I tied it at the top with some Early Espresso Baker's Twine and a Mini Jingle Bell.
I added a scarf that was cut at 1" x 12" and tied it on a knot. I made his eyes and mouth by punching Chocolate Chip Cardstock with both sizes of the hole punches on the Cropodile. I punched the large heart with the Heart to Heart Punch out of Pumpkin Pie for his nose. I used a dauber in Rose Red for his cheeks.
I stamped the sentiment with the Occasions Alphabet in Real Red. I punched it out with the Oval Punch and layered it onto a piece of Wild Wasabi punched with the Scallop Oval Punch. I added a Holly Berry Bouquet Button tied with Espresso baker's Twine to finish it off. I hope you think he's as cute as I do and hope you'll try making a few for some of your Holiday gifts. Thanks for coming by!

Tuesday, November 15, 2011

LAST TAG! :

Here's one last tag for you. I used the Tags Til Christmas set and punched it out with the Decorative Label Punch. I used Always Artichoke and Soft Suede ink. I added a border of Gold Glitter around the edge.

I made a tag out of Always Artichoke Cardstock by using the Corner Punch. I stamped the flourish in the background with the Season of Joy set and added some Dazzling Details. I have a flower peeking out at the bottom made with the Blossom Bouquet Triple Layer Punch. I added an Antique Brad and some Crumb Cake Seam Binding for an elegant effect.

That is the last of the tags-I'm ready to move on to something else! I'll be having a class the first week of December to make these tags. If you're interested in attending, let me know. Tomorrow, I'll share a cute Snowman with you. Thanks for stopping by!

Monday, November 14, 2011

TAG # 8:

Thanks for stopping by. Here's another tag for you. I used the Punch Pals set on Wild Wasabi with a Melon Mambo border. The smaller tag was punched out with the Tag and Large Tag Punches.

I used the 3/4" Circle Punch to punch out the snowflakes and popped them up with Dimensionals. I added some Marina Mist Scallop Dotted Ribbon on top of a sliver of Certainly Celery and added a button for a finishing touch. I'll have one more tag tomorrow and then I have a couple of cute snowman projects to share with you. Thanks so much and check back tomorrow!

Sunday, November 13, 2011

TAG # 7:

Here's another tag that I used with the Two Tags Die. I ran it through on the Big Shot on Whisper White Cardstock and used a piece of DSP from the Brights Paper Stack. I used the Stocking Accents Die for the candy cane and attached a bow made from Real Red Taffeta Ribbon. The sentiment is from Sweet Season and the swirl images are from Pennant Parade and Holiday Bingo Bits-I think those are the right names-I'm too tired to go look at a catalog. Sorry, being kind of lazy tonight!

I added some White Baker's Twine, and it's ready to go. I have 2 more tags to share with you, so make sure to stop back tomorrow. Have a good night!

Saturday, November 12, 2011

TAG # 6:

Here's the fun little Santa tag that I promised you. I ran Whisper White through the Big Shot using the Two Tags Die. I punched an oval in Blushing Bride for his face. I used a dauber in Regal Rose for his cheeks.

I used the Owl Builder Punch to punch out his eyes, nose and Glimmer ball on his hat. I cut out another tag and scalloped the top of it for Santa's beard and popped it up with dimensionals. I used the Heart to Heart Punch for his hat and punched it out of the Red Glimmer Paper. The trim on his hat was made using the Tasteful Trim die. I hope you like this jolly little fellow. I have a few more tags for you, so be sure to stop back. Have a great night!

Thursday, November 10, 2011

TAG # 5:

Here's another tag for you! I ran a pice of Wild Wasabi through the Big Shot using the Two Tags Die. I stamped the snowman in Wild Wasabi using the Button Buddies set and put a Pumpkin Pie brad through one of his buttons.

I stamped the snowflake from Every Little Bit in Bashful Blue and the other background image is from the Pennant Parade set in Melon Mambo. I added a strip of Bashful Blue Cardstock and punched a strip of Pumpkin Pie DSP with the Scallop Border Punch. I added a little bit of the Melon Mambo Dotted Scallop Ribbon for some fun. I'll have a cute little Santa for you tomorrow. Thanks for stopping by!

Wednesday, November 9, 2011

TAG # 4:

Here's another tag. I used the Peekaboo Die from the Holiday mini and cut it out of Silver Glimmer Paper. I added a little red square on top and stamped the to and from again from the Fabulous Phrases set. I stamped off the floral image in Basic Grey using the Style Beautiful set and added a Rhinestone Brad to add a little more bling.

I added the inside sentiment from Word Play in Basic Grey and colored the ornament in with a Real Red marker. I hope you're enjoying these tags. Make sure to stop back tomorrow to see more. Have a good night!

Tuesday, November 8, 2011

TAG # 3:

Here's another tag that I made. It uses the Stitched Stockings Set and coordinating punch. I used the Red and Silver Glimmer Paper with a Basic Rhinestone in the center. I needed big tags for these big boxes, so I used the 2 1/2" Circle Punch for the bottom circle and layered it with the 2 3/8" Scallop Circle and 1 3/4" Circle Punches.

I used the pennant from the Petal Cone Die and the stamp set used for the to and from is Fabulous Phrases. I tied it on with White Baker's Twine. I hope you've liked the tags so far. Check back for a few more ideas!

Monday, November 7, 2011

ANOTHER TAG:

Here's another tag I have to share with you.

I used the Pennant Parade set and punched out 4 of the trees with the Petites Pennant Builder Punch. I scored all the trees down the middle and folded them in half with the stamped side inside. I used SNAIL to adhere the on top of each other and fanned out the tree on a tag made with Naturals Ivory Cardstock. I made s frame in Cherry Cobbler using the Desinger Frames Enbossing Folder. The To and From is from the Fabulous Phrases set and it truly is a Fabulous set! I think I need to add a star or brad or something to the top of the tree. I can't believe I left it naked! Make sure you check back for maore tag ideas!

Saturday, November 5, 2011

CLUB MEMBER GIFTS:

These are the gifts I gave to my Club Members. I do some shopping for them in Memento Mall at Convention. Just a little extra incentive to join a club-well, okay, it's bribery, but I have fun with it. And I think they do too.

For my new Club members, I gave them a Tote and matching pen. You can see them under a previous post entitled MINI CONVENTION. For each member who signed up for a consecutive club, I added another little gift-the Catalog Stickers, which were also shown in the previous post with the taote and pen.

The next crew got one of these cute Ribbon Sampler Key Rings. Some were in blues/greens and some were in corals/pinks.

The next group got one of these adorable Collapsible Trash Cans. These were a huge hit. I wish I could have given them all one.

And finally, I have 2 Club members who have signed up for every round of club that I've had, so they each got one of these Insulated Tumblers in addition the what everyone else got. I'm so thankful for all of my Hostesses and Club Members and I enjoy doing this event for them every year. If you're in the neighborhood and would like to join my next round of Clubs, they will run fron January to June. I'd love to add you to the list for next year!

Okay, here is one of the Christmas Tags that I promised you. I used the Tags Til Christmas set for this.

I stamped it on Sahara Sand cardstock with Baja Breeze ink. I colored the hat in with a Garden Green Marker and the scarf with Real Red. I punched it out with a circle punch and the small scallop circle punch. I added a snowflake from the decorative strip and topped it with a Bitty Button tied with Cherry Cobbler Baker's Twine. To finish it off, I added some little dots of Dazzling Details on the snowflakes. I have 8 more tags, so be sure to check back tomorrow to see another one. Good night!

Friday, November 4, 2011

HOSTESS APPRECIATION NIGHT!

Last night was my annual Hostess Appreciation Night. I had 13 wonderful gals attend and we had a great time! This was the table set up before I got their favors done. As I said yesterday, I finished with them about 5 minutes before the guests started arriving! Talk about stress!

I wished I could have gotten them all at the same table, but at least they were all in the same room-kinda.

This is what I made for each of them and filled the box with chocolate truffles. I love our Kraft Boxes from the Holiday mini! It saved me a ton of time not having to make the container too.

I used the Spice Cake DSP, fabric and buttons for these. I added some wide Striped Grosgrain Ribbon and Early Espresso Baker's Twine. And the 'eva so fabulous' Simply Scored to make the lollie flowers.

This is one of the place cards I made for them. I took the design from one of the SU! concept artists who designed ours for the Artisan Dinner at Convention. I thought it would be super easy since I didn't have to come up with an idea, but man they still took awhile. If there was a trick, I sure never figured it out! I have a new appreciation for their work.

My daughter Olivia came to the rescue and filled the boxes for me before she ran to pick up salads and breadsticks. But I almost had a stroke when she when she brought 4 boxes into the kitchen...without their coordinating place cards...that I spent hours on coordinationg...and were now not! It's a good thing my life is always in some form of chaos, or I think I could have a problem-think Monk. it's a good thing I didn't have time to stress about it, but I really wanted to!

Here's the invitation I made. Again, I cased their idea from the Artisan Dinner.


Here's the originals. Somebody in the art department has a sick sense of humor when it comes to ribbon. You thought bows were tricky! But the extra effort paid off. I think they all felt special. I know I did when I received mine.

I'm so mad I didn't get pictures of everyone.It was one of many things I thought of, but didn't get done. That probably would have been a job for my Superhero Hubby, but he was doing a remote with our local radio station at Wal-mart for Operation Christmas Child. I still managed to find plenty for him to help me with when he got home though.

One of the things he did earlier was make a couple of wonderful Pumpkin Pie cheesecakes. He even made the whipped cream for them! he got rave reviews!

We started out the night with salad and breadsticks. Next I served them spaghetti with my own sauce.   I've never liked any that I've bought at the store, so I just make my own. Can you say picky?  Next came dessert and coffee. One of the ladies brought a scrumptious Bavarian Apple Torte. It was a huge hit as well.

After I stuffed them to the gills, I had some presents for all my Club Members, and then we did a Make & Take. I'll share more details with you tomorrow...so make sure to check back in!

Thursday, November 3, 2011

DEMO MEETING MAKE & TAKE:

Sorry I didn't get this posted a couple days ago like I said I was going to. I've been a little crazy the past few days getting ready for my annual Hostess Appreciation Night, which was tonight. And it's a good thing I skipped posting the past couple of nights, because I needed every extra spare minute I had. I got done making their favors 5 minutes before the first guest arrived! More about that tomorrow!

Now, let's talk turkey! This little box was made with the Mini Milk Carton Die. I cut out 2 in Pumpkin Pie and cut one section off of each-make sure it's the side without the tab-and you'll have a 6 sided box which I thought would work great for a pumpkin. I sticky stripped the bottom and rolled up a crimped piece of Crumb Cake for the stem. I cut a few notches in the bottom of the stem and sticky stripped it to the inside of the pumpkin. I put some candy corn and peanuts in a baggie and carefully wrapped it aroung the stem.

Oops, I need to back up a little bit. I also ran the Pumpkin Pie pieces through the Big Shot with the Stripes Embossing Folder. I stamped the tag with the Gift Givers set and punched it out with the Curly Label Punch. I colored the turkeys body with Crumb Cake and his feathers withe Soft Suede and Pumpkin Pie.

Next, I punched holes around the top with the Cropodile and threaded Pumpkin Pie ribbon through it. It works a lot better to put the tag on and then tie the bow-it's a really tight fit. Finally, I thread a skinny strip of Old Olive through a button, spritzed it with alcohol, and wrapped it around a skewer to make it curly. I popped the button on with a dimensional, and there's your pumpkin!

I am really beat, so I'm going to hit the sack. I'll have lots to share with you from my Hostess Appreciation Night, so be sure to check back. Have a great night!