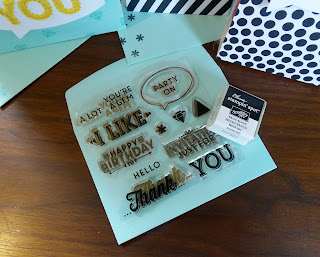
Here's the stamps set and spot that came with the kit. Another versatile set:)
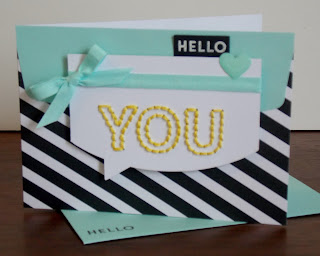
This is basically the card as made according to the kit instructions. I love the texture the stitching adds. It took me about 20 minutes to stitch one card, which included threading the needle, grrr. I've discovered that at 52, it's much easier to 'Thread the Needle' in pilates than it is in sewing. It most likely won't take you as long as it did me:(
In case you really don't like the sewing part, I have a couple of different options for you. For this card, I used a VersaMarker. SU! retired ours, but I'm sure they're still out there somewhere. I used the brush end and went over the dotted lines several times. I then applied Crushed Curry Embossing Powder over it and heat-embossed it using the Heat Tool. It wasn't exactly what I had in mind, but it was quicker than the alternative.
Here's another option...I just used a Daffodil Delight Marker to go over the lines using the fine tip end. Instead of using the floss for the stitching, I just wrapped it around the card and tied a bow. I made a little bumblebee using the Six-Sided Sampler stamp set in Basic Black onto Daffodil Delight Cardstock. I cut it out with my Paper Snips and added a couple of Vellum Cardstock wings using the heart from the Itty Bitty Accents Punch Pack. I stamped the sentiment with Whisper White Craft ink onto Basic Black Cardstock and heat-embossed it with White Embossing Powder. I used the retired Word Bubbles Framelits to cut it out.
I easily converted one of the card bases into a treat bag by scoring at 1/2" before and 1/2" after the fold line. I put some candy in a Cellophane Bag and stapled it shut. I simply adhered a piece of Daffodil Delight Cardstock behind the YOU to help it stand out a bit more. I added a Clothespin and attached one of the fun stickers from the kit to it.
There's no such thing as too much candy, but in this case, I may have overfilled the bag, as it didn't want to cooperate and stand up.
The kit came with enough supplies to make 9 notecards with adorable matching Pool Party envelopes. But you could actually stretch it out to get 18 cards if you cut the black & white card bases in half, like I did with this card. The only problem you'd have is you'd be short 9 envelopes, but you could always make your own with the Envelope Punch Board...so not really a problem at all:) Again, I used the retired Word Bubbles Framelits to cut out the word bubbles (sorry if you don't have them.)
I played around with one of the envelopes and came up with a cute little gift card holder. Before I get to that, I wanted to see what it would look like if I colored the letters in with a Daffodil Delight Marker before I stitched it~I likey:)
I cut off the bottom of the envelope at 2 1/4" from the bottom, and trimmed it to a hair under 5" widthwise.
I cut 3/4" off the top of the side with the seams and made a notch in the center using the 1" Circle Punch.
Make sure to attach the ribbon before you adhere to the card base.
Slide the card base into the envelope 'taco' and adhere the front.
You may need to trim a hair off the right side of the envelope on the inside, so it will close easily. Put adhesive on the side flaps only, so you can put a gift card inside the pocket.
And last but not least...
I recycled the envelope flap for this card and added some Pool Party Cotton Ribbon.
I'll be back with one more kit to share with you tomorrow, and then I have to wait til I get my June kit. Make sure you sign up to get your own Paper Pumpkin kit by June 10th if you want to attend my Pumpkin Party on July 30th. Read all about it on the June 4th post. Thanks so much for stopping by!


AMAZING WORK LauraLou! LOVE THEM ALL!
ReplyDeleteThank you much James Earl Jones:( )
ReplyDeleteI really enjoy seeing all your beautiful creations, Laura! I'm a Stampin' Up demonstrator in Galesburg, IL, so we are practically neighbors!!!
ReplyDeleteOh cool Sandy! Thank you so much:)
ReplyDelete