Hello there! As mentioned in my previous post, I held a Paper Pumpkin Party a few days ago, and I dug out the past kits that are still available to Paper Pumpkin subscribers. This kit is called Wish Big and was the kit for July of last year. To be honest, I wasn't overly impressed with it at the time. I made a couple projects pretty close to the instructions, and then buried the box in the closet.
Here's the stamp set included with the kit, along with a Blackberry Bliss Spot and a whole roll of Whisper White Satin Ribbon:)
These are the projects made according to the instructions. Pretty blah to me.
When I dug out the box and began working with it, I was pleasantly surprised with the alternate projects I came up with:) For this card, I added a piece of Blackberry Bliss Cardstock which I ran through the Big Shot using the Large Polka Dot Embossing Folder. I cut off a strip of the Soft Sky sticker sheet and added it to the bottom.
On this card, I used the tiny star to stamp the background using Smoky Slate ink. I added a piece of Soft Sky Cardstock and rounded the corners using the Project Life Corner Rounder Punch. I cut off one of the panels of one of the boxes and layered it on top. I simply cut the striped sticker into smaller pieces for the candles.
I used another panel of the box I cut up for this card and made a pennant out of it. I cut a thin strip of Whisper White Cardstock~the width of one of the rolls of Bohemian Washi Tape and covered the cardstock. It was a little lighter than the stripe on the box, so I added a second layer of washi tape and it was perfect:) I used the Neutrals Color Collection for the DSP and sprinkled a few sequins around from the Metallics Sequin Assortment.
For this card, I started with a Soft Sky base and added a piece of Bohemian DSP to it. I've had this paper since May and this is the first time I've used it. We were very limited with the DSP we could order during the Preorder for the catalog. I broke down and ordered it even though I didn't really like it, and every time I've pulled it out to use it for a project, I say 'gross' and put it back...but I finally found the perfect use for it:) I added a tiny button from the Brights Buttons.
And speaking of gross...this is why I don't make flowers. Look at that thing! It's not even worth commenting on, lol.
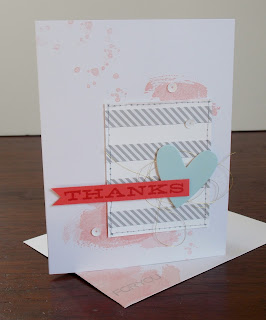
This was one of my favorite projects made with the kit. I used the sets Work of Art and Gorgeous Grunge for the background using Blushing Bride ink. I layered a piece of Whisper White Cardstock with the striped stickers I cut down to fit it, and used the Essentials Paper-piercing Pack, Mat & Tool for the border. I used a Smoky Slate Marker for the faux stitching. I used Watermelon Wonder Cardstock and ink for the sentiment. I used some of the Gold Metallic Thread under the heart~fun! And added a few Metallic Sequins.
Here was my alternate project I made at the time I got the kit...not too exciting.
And last but not least...I think this may be my favorite:) I used what was left of the box I cut up and came up with this fun little guy. Perfect for Halloween...which will be here before we know it!
I took the box apart, and cut it to look like this. I scored a 1" from each of the score lines.
It should look something like this after everything is scored and folded.
I used Fast Fuse to adhere the box in the back.
I folded the bottom sides in and tucked the bottom flap inside...no need for adhesive.
I used the Word Window Punch with Pumpkin Pie Cardstock for his eyes and added some googlie eyes on top. I cut apart one of the stars for his horns and adhered to the back using Liquid Tombow. His mouth was made with the Balloon Framelits using Crushed Curry Cardstock. I added a piece of Pumpkin Pie Cotton Ribbon and strung the tag through it using the 1 1/4" Circle Punch.
Here's what it looks like from the back~don't mind my scribbles...I put the measurements there for ribbon, etc.
I stuck a 4" x 6" Cello Bag in the box and filled it with Hugs & Kisses and tied it with a piece of Whisper White Baker's Twine, also included with the kit.
It's amazing what you can come up with once you get started...even with something you didn't like initially:) There's still lots more to come, so make sure to stop back tomorrow. Thanks so much for looking!


No comments:
Post a Comment