Hello there! Sorry for the break, but I've had lots going on. We finally got our little girl! Our daughter Olivia had Elise Lauren on August 16th. A whopping 5 pounds, 6 oz.:
You'd think dad did all the work, lol...
Quinten wasn't too sure about her at first, but it didn't take him too long to step up to 'Big Brother':)
He loves his little sissy:)
And here's my biggest grandbaby, Gabe with his brand new cousin. I am one blessed grandma to have these 3 Amigos:):):)
Here's the stamp set that came with this month's kit, along with a Whisper White Craft Spot.
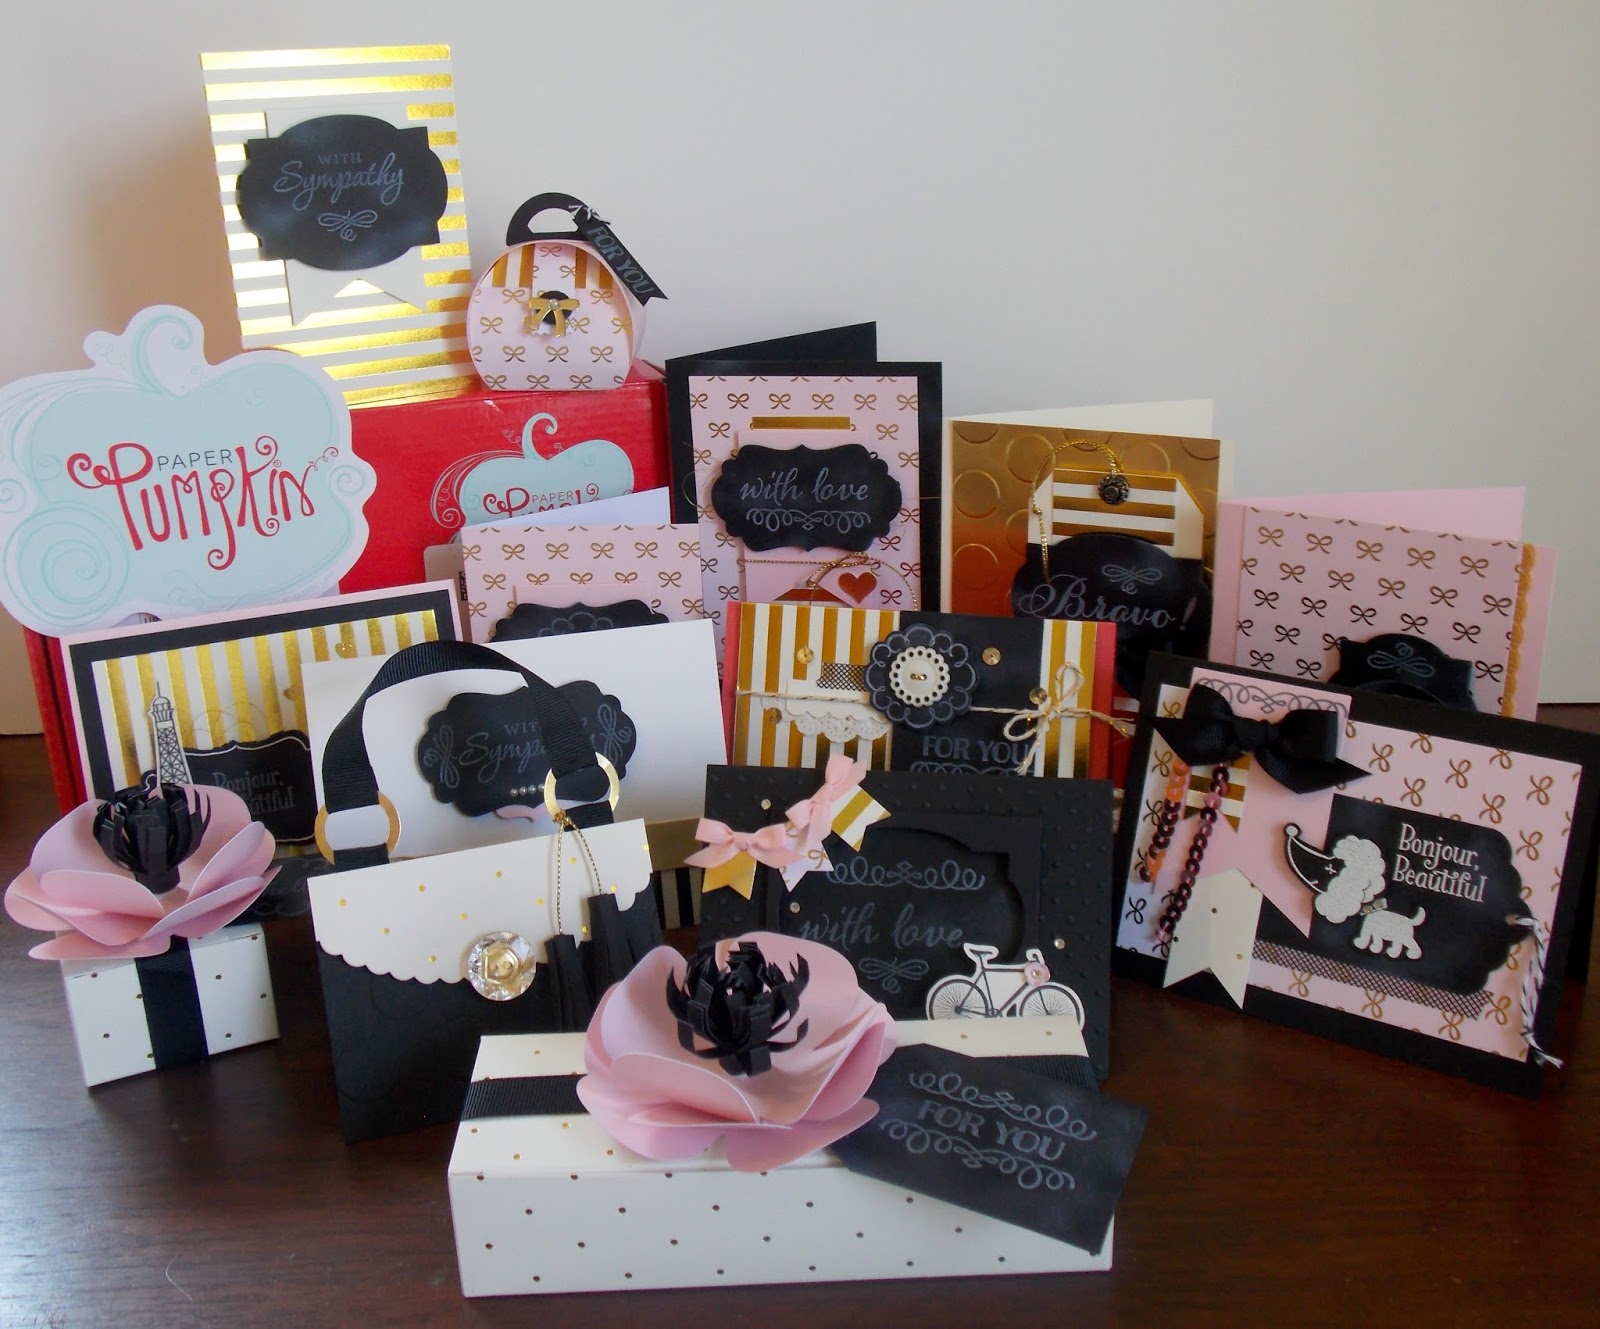
These are the projects made according to the kit instructions~3 pink/gold foil cards, 3 gold foil stripe cards and 3 gift boxes. Again, Paper Pumpkin really outdid itself this month!
Here's an alternate card I made using a Watermelon Wonder base and the same color Dotted Lace Trim. I added some Gold Metallic Baker's Twine, Tea Lace Doilies, Everday Chic Washi Tape, Very Vintage Buttons and Gold Sequin Trim. I added a Very Vanilla scallop trim piece using the Berry Basket Die.
For this card I started with a Pink Pirouette base and added both cardstock designs. I tucked a piece of Delightful Dijon Dotted Lace trim underneath. I used the Washi Label Punch in Gold Foil Sheets and added some Blushing Bride Sequin Trim. I used the Itty Bitty Accents Punch Pack for the flower and added a Basic Pearl to the center.
I made a miniature box by cutting it down. I was hoping to get 2 mini boxes out of one of the included boxes, but they would have been too overwhelmed by the flower.
I started with a Very Vanilla base and added a Gold Foil Sheet on top which I ran through the Big Shot using the Large Polka Dot Embossing Folder. I added an Antique Brad and some of the brand new Gold Cording from the Holiday Catalog. The sentiment is from the set Bravo.
Everything about this kit looked like Paris to me, so I had to 2-day a couple of stamp sets to help me pull it off. I got the set Happy Happenings for the sentiment and printed off a tiny Eiffel Tower that I found on Pinterest. I added some Pink Pirouette Seam Binding, Metallic Sequins, Metallic Thread, Gold Sequin Trim and a Subtles Button. I used a White Gel Pen to draw the border around the tag.
I also needed the set Hot Diggity Dog for the poodle:) I started with a Basic Black base and added some Blushing Bride Sequin Trim, Everyday Chic Washi Tape, Basic Black Baker's Twine and Basic Rhinestones to her collar.
For this card I added some Gold Metallic Thread and Gold Cord. I punched out a heart from a Gold Foil Sheet using the Itty Bitty Accents Punch Pack and placed an Itty Bitty Accent Epoxy Sticker on top.
I made a fun little purse which doubles as a gift card holder. I started with a Basic Black base that I ran through the Big Shot using the Large Polka Dot Embossing Folder. I cut apart one of the boxes in the kit and ran it though the Big Shot using the Ovals Framelits for the flap.
I used the 3/4" and 1" Circle Punches to cut these out of a Gold Foil Sheet. I used the ribbon provided in the kit and attached it through the circles.
I adhered the ribbon to itself as shown using Tear & Tape Adhesive.
Add a Glue Dot to the top and botton of the ring to keep the ribbon in place for the handle.
Attach the handle to the base using Tear & Tape, folding the ribbon as shown. Then attach the purse flap with Dimensionals over the top.
I cut one of the flower center strips in half and added a 5" piece of Gold Cording to one end. I rolled it up and repeated the process for the other end of the cording.
I put the cord through one of the rings and tied it in a knot~actually, a couple of knots to shorten the tassels up a bit. Finally, I added a Gold Foil circle underneath a Vintage Faceted Button and attached to the flap with Glue Dots.
I was inspired for this card by one I saw on Pinterest. I started with a Shimmery White base and added a piece of Gold Satin Ribbon and a bow. I used the Label Bracket Punch in Pink Pirouette Cardstock for the detail underneath the label and added a row of Basic Pearls. It seemed kind of plain when I got finished, and thought about pulling everything off and running it through the Big Shot with an embossing folder, but I thought maybe my card ladies would appreciate an easy one:)

This one is note card size to fit with the envelopes included in the kit. I started with a Basic Black base and cut out the center with the Ovals Framelits. I then ran it through the Big Shot using a retired embossing folder. I used the leftover piece from one of the tags and trimmed it evenly on all sides. I laid it on top of the oval window I cut from the base and traced the squared part of the frame with a pencil. I cut out the notches and adhered to the base with Dimensionals. I cut a rectangle, stamped the sentiment and adhered it to the top piece on the inside with Dimensionals. I used a past Paper Pumpkin kit for the bike, cut it out and attached with a Dimensional as well. I used the Banner Punch to punch out the banners and attached the outside ones with Dimensionals and the middle one with Liquid Tombow. I added a couple of Blushing Bride Cotton Ribbon bows and a flower made with the Tree Builder Punch. I sprinkled a few Basic Rhinestones around for the finishing touch.

And my favorite project is this sweet little French Train Case. I used the Curvy Keepsake Box Thinlits with Pink Pirouette Cardstock. I ran the handle through the Big Shot again using Basic Black Cardstock to make the handles. I simply glued the black over the pink. I glued both designs of cardstock from the kit to the front using Liquid Tombow and made the flap with the Washi Label Punch. I heat-embossed one of the Classy Buttons with Black Embossing Powder and Black StazOn ink. I made the Gold Foil bow with the Balloon Framelits and added a Basic Rhinestone. I attached the tag with Basic Black Baker's Twine.
I got a little carried away this month. I couldn't help it, once I got started, I was on a roll:) I can't wait to meet with my Pumpkin Pals tomorrow night and share all these ideas with them. And to share a yummy pumpkin treat as well:) Thanks so much for stopping by!


Your alternatives for the paper pumpkin are wonderful, especially the purse!
ReplyDeleteCongrats on the baby
Thank you so much Happy Scrapper:)
ReplyDeletethe alternate ideas are great and the pumpkin treat in a jar looks equally wonderful...I have been scrolling back to see your projects but I saw the pumpkin pie treat in a more current post...yum!!!
ReplyDeleteThank you Jan! It was yummy:)
ReplyDelete